 | Products |
| Home » Technical Support » ElevateDB Technical Support » Technical Articles » Building a Sales Quote Replication System in ElevateDB |
Published on Fri, Jun 20 2008
ElevateDB 2.0 introduces replication functionality that allows one to set up a network of ElevateDB Servers and stand-alone ElevateDB applications or other ElevateDB Servers. In this technical article, we'll show you how to set up a basic replication system for a fictitious sales quotation application. For a primer on the replication functionality in ElevateDB before going further, please see the Stores and Replication topics in the ElevateDB SQL Manual.
 This technical article requires the use of ElevateDB 2.01 or higher. There were a couple of minor bugs in the PUBLISH DATABASE functionality and LOAD UPDATES functionality for 2.00 that were resolved in 2.01.
Requirements of the System
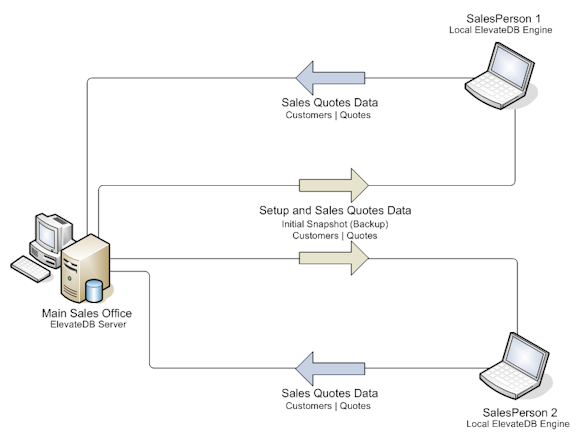
Let's first cover the requirements of the fictitious sales quotation system. The main sales office houses the main database server machine, which will be running a copy of the ElevateDB Server. Each salesperson works in the field and will carry a laptop containing the sales quotation software that will be used to enter in sales quotations.
Now we'll define the database for the main office:
The main sales office database is defined as follows:
You can use link at the end of the article to download the database creation script for the main sales office database (createmaindb.sql).
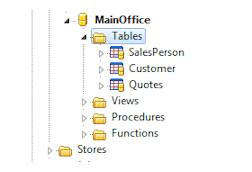 As you can see, the sample databases consist of three tables:
The Customer table contains a foreign key constraint that links each customer to a specific salesperson in the SalesPerson table. The Quotes table contains a foreign key constraint that links each Quote to a specific customer in the Customer table. The constraints will ensure the integrity of the database by preventing any quotes from being entered for non-existent customers. We've only entered data for the salespersons, and will assume that this is a new system with no customers or quotes to start with.
One of the common problems that you run into with replication is how to handle IDENTITY columns that are auto-assigned numbers. You can't use the same range of numbers for each salesperson's copy of the database - doing so would cause primary key violations when the updates are loaded at the main sales office. In this example, we've decided to solve the issue by using a different range of numbers for each salesperson. We're being a little clever in how we're assigning the range of numbers for each salesperson by using IDENTITY columns in the SalesPerson table that increment separately for customer numbers and quote numbers:
In our example, 10,000 customer numbers is plenty for each salesperson, as is 100,000 quote numbers. That gives us the possibility of a maximum number of just over 20,000 salespersons without running into issues with overflowing the INTEGER type used for these columns. We will use these numbers to assign the starting IDENTITY column seed values for the Customer and Quotes tables when we first create the database on each salesperson's laptop. To accomplish this, we'll include a stored procedure in the database definition called UpdateIdentityRanges that accepts one parameter, the salesperson ID, and alters the Customer and Quotes tables so that they are using the proper seed values for their IDENTITY columns based upon the salesperson using the ALTER TABLE statement.
You will also notice that we have defined an after-insert trigger for the SalesPerson table using the CREATE TRIGGER statement that will create the necessary inbound and outbound stores for use in distributing updates to and from the salespersons' laptops using two CREATE STORE statements.
We will be using the same database definition at both the main office and on each salesperson's laptop. However, the way each table is replicated will differ depending upon where it is located.
The SalesPerson table will only be replicated from the main sales office's ElevateDB Server to the remote salesperson laptops. It is outside of the scope of this article, but normally you would then make sure that the local user security for the database on each salesperson's laptop would prevent the salesperson from modifying the contents of the SalesPerson table.
The Customer and Quotes tables will be replicated in both directions. In some organizations it might be desired to keep each salesperson's customers and quotes separate so that one salesperson cannot see the other salespersons' data. However, in our case we want to make sure that any salesperson can handle any customer or quote, regardless of which salesperson originated the customer or quote.
To summarize how the replication will take place:
Setting up the Main Office Database
To set up the database at the main office, we will simply execute the DDL statements (in a script) listed previously for the database definition. However, we also need to set up the database as follows:
1) We need a local store that we can use for transferring a backup of the main sales office database and a local store for saving the update files that we will transfer to and from the salespersons' laptops. We will use the CREATE STORE statement to create two stores, one for the initial setup backup file, and one for storing the update files as they are generated.
2) We then need to add some salespersons to the main sales office database. We will do this by using simple INSERT statements.
3) Finally, we need to backup the database using the BACKUP DATABASE statement and publish the database using the PUBLISH DATABASE statement.
All of this will be done using the following script:
This script is included with the source code for this article as setupmainoffice.sql.
 It is very important that we make the backup of the main sales office database prior to publishing any of the database tables. This is because the publisher ID (GUID) for each published table in a database is stored in the database catalog, and if we were to backup the database after we published it, the laptop databases would be created using the same publisher IDs as the main office and would break the ability of ElevateDB to synchronize updates properly. To verify that the publisher IDs are unique, you may query the Tables Table in the Information schema for each database. As of ElevateDB 2.05, you can also use the RESET PUBLISHED TABLES clause of the RESTORE DATABASE statement, but we are not using that here because there is also a mismatch in terms of which tables are being published in the main office database versus which tables are being published for each laptop database (the SalesPerson table is not published for each laptop database).
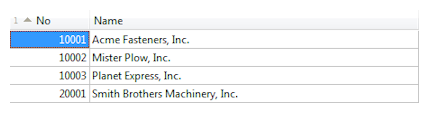
The SalesPerson table now looks like the following:

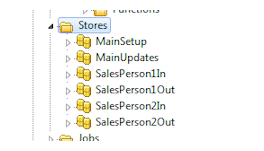
And there are now six local stores defined at the main sales office:
Setting up the Salesperson Databases
We now need to create a script that can be used to set up each salesperson database when the application is first installed on each laptop. Such a script will need to do the following:
1) Create a local store using the CREATE STORE statement as a destination for the backup file that will be copied from the ElevateDB Server at the main sales office using the COPY FILE statement, and create a remote store that will point to a store at the main sales office that will contain the backup file that we created above.
2) Create the local database for the laptop using the CREATE DATABASE statement, restore the backup file that was copied from the main sales office using the RESTORE DATABASE statement, and then publish the Customer and Quotes tables in the local database using the PUBLISH DATABASE statement.
The script accepts one parameter, the salesperson ID. It is assumed that this ID will be assigned during installation and will not change. The script looks like this:
This script is included with the source code for this article as setuplaptop.sql.
We're using the local loopback address 127.0.0.1 and the default user name and password for the remote store, which means that we're running a default installation of the ElevateDB Server on the same machine and using the same configuration that we're using for the laptop databases. You'll want to change these accordingly to match your setup. Also, all objects (such as stores and databases) created for the laptop contain the salesperson ID as a suffix to their names and paths. This is done so that you can test out this setup using the same configuration on the same machine and not have to worry about the names conflicting with one another.
There is now one local LaptopSetup store and one remote MainSetup store defined on each salesperson's laptop:
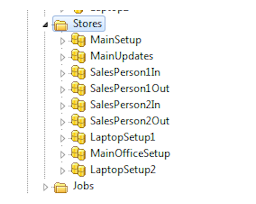
In this case, since we're using the same configuration for both laptop databases, there is only one MainSetup store defined that is used by both.
Setting up the Synchronization at the Main Sales Office
Okay, so now we've got the databases set up at the main sales office and on both salesperson laptops. Now we need to set up the synchronization process. We can start with the main sales office, which will need to create a single update file each night and copy this update file to the salesperson-specific stores so that it will be available for the salespersons to copy back to their laptops and apply to their copy of the database. Because we want to create a new update file every night, we will use a job that can be scheduled to run every night at a specific time. This job will need to do the following:
1) Loop through the SalesPerson table and load any update files present in the inbound salesperson store into the main sales office database according to the creation order of the update files. We will use the LOAD UPDATES statement to load the updates.
2) After the saleperson update files are all processed, all updates for the main sales office database are then saved to an update file and copied to all outbound salesperson stores using the SAVE UPDATES statement.
Here is the job in script form, which will make it easier to execute for the purposes of demonstrating the functionality:
This script is included with the source code for this article as mainofficejob.sql.
Setting up the Synchronization on each Salesperson Laptop
The next step is to define a script that will actually complete the process of synchronizing each laptop machine with the main sales office. Since each laptop will be controlling the synchronization process, this script will be executed on-demand at the laptop by the salesperson. The steps involved with synchronizing with the main sales office are:
1) Make sure that the stores necessary for the synchronization are defined. There will be both inbound and outbound local stores for storing the inbound and outbound update files, respectively, and both inbound and outbound remote stores that will be used to transfer the local update files to and from the appropriate inbound or outbound salesperson store at the main sales office. We will use the CREATE STORE statement to create any necessary stores.
2) Save any updates to the Customer and Quotes tables in the local laptop database to an update file in the outbound local store using the SAVE UPDATES statement.
3) Loop through the outbound local store and copy any update files to the inbound remote store at the main sales office using the COPY FILE statement. If the copy completes, then delete the update file in the outbound local store using the DELETE FILE statement. This ensures that any update files that did not get copied successfully during the last synchronization will be copied during the current synchronization, and that once an update file is copied successfully it will be deleted so that it no longer needs to be copied.
4) After copying the outbound update files, copy any update files from the outbound remote store at the main sales office into the local inbound store using the COPY FILE statement. If the copy completes, then delete the update file in the outbound remote store using the DELETE FILE statement. Again, this ensures that any update files that did not get copied successfully during the last synchronization will be copied during the current synchronization, and that once an update file is copied successfully it will be deleted so that it no longer needs to be copied.
5) Finally, loop through the inbound local store and load any update files into the local salesperson database using the LOAD UPDATES statement. Once an update file is loaded, delete it from the inbound local store using the DELETE FILE statement.
This script is included with the source code for this article as laptopsynch.sql.
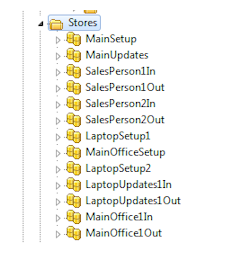
After running the synchronization for the first time, the new LaptopUpdatesIn and LaptopUpdatesOut local stores and the new MainOfficeIn and MainOfficeOut remote stores will be created on each laptop:
Testing the System
Okay, so we've got everything set up now for both the salesperson laptops and the main sales office. It's time to test things out to make sure that everything is working. To do this, we'll enter in some customers and quotes for each salesperson to simulate the process of creating quotes. We also need to make sure to set the IDENTITY column ranges for the Customer and Quotes tables so that they match those set in the SalesPerson table. We'll do that by calling the UpdateIdentityRanges stored procedure that is present in every copy of the database for the salespersons before inserting any rows.
The following script can be called with the proper SalesPersonID in order to insert all of the necessary test rows:
This script is included with the source code for this article as laptopinsert.sql.
We now have updates in both salesperson laptop databases that need to be synchronized with the main sales office database. All we need to do now is run the synchronization script that we created with the proper SalesPersonID and the script will synchronize all of the updates with the ElevateDB Server running at the main sales office.
To test the whole process, let's go through the steps. You can use the ElevateDB Manager to execute all of the scripts included with this article.
1) Make sure that the ElevateDB Server is running locally on the same machine, listening for requests on all addresses (the default) or address 127.0.0.1 and port 12010 (the default). Please see the Starting and Configuring the ElevateDB Server topic in the ElevateDB SQL Manual for more information.
2) Create the main sales office database (MainOffice) by executing the CREATE DATABASE statement (described at the beginning of this article) and then execute the createmaindb.sql script from the context of the MainOffice database to create all of the tables and other database objects.
3) Setup the main sales office database by executing the setupmainoffice.sql script.
4) Setup the laptop database for salesperson 1 (Laptop1) by executing the setuplaptop.sql script with the parameter of 1.
5) Setup the laptop database for salesperson 2 (Laptop2) by executing the setuplaptop.sql script with the parameter of 2.
6) Insert the rows into the Laptop1 database by executing the laptopinsert.sql script with a parameter of 1.
7) Insert the rows into the Laptop2 database by executing the laptopinsert.sql script with a parameter of 2.
8) Synchronize the Laptop1 database by executing the laptopsynch.sql synchronization script with the parameter of 1.
9) Synchronize the Laptop2 database by executing the laptopsynch.sql synchronization script with the parameter of 2.
10) Load the updates into the main sales office database and create the appropriate update files for distribution to the salesperson laptops the next time they synchronize by executing the mainofficejob.sql script.
If you look at the main sales office database (MainOffice) at this point, you should see all of the rows from both salesperson laptop databases. Now, if you execute steps 8 and 9 again you will see the full bi-directional replication in action. All three copies of the database (MainOffice, Laptop1, and Laptop2) should now be identical.
Summary
Replication can be an especially complicated task at times, and this technical article should help shed some light on some techniques that are both simple and useful. As always, if you have any questions at all, please feel free to post them in the ElevateDB newsgroup here:
ElevateDB General Support Forum
This will allow everyone to share in any new ideas or comments that you may have regarding this article.
The next technical article will be entitled ".NET Data Provider Tips and Tricks", so look for it soon.
 Source Code for this Article
Requirements of the System
Let's first cover the requirements of the fictitious sales quotation system. The main sales office houses the main database server machine, which will be running a copy of the ElevateDB Server. Each salesperson works in the field and will carry a laptop containing the sales quotation software that will be used to enter in sales quotations.
Now we'll define the database for the main office:
CREATE DATABASE "MainOffice"
PATH 'c:\mainoffice'
DESCRIPTION 'Main office example database'
The main sales office database is defined as follows:
CREATE TABLE "SalesPerson"
(
"ID" INTEGER GENERATED BY DEFAULT AS IDENTITY
   (START WITH 0, INCREMENT BY 1) NOT NULL,
"Name" VARCHAR(40) COLLATE "ANSI" NOT NULL,
"CustomerNoStart" INTEGER GENERATED ALWAYS AS IDENTITY
   (START WITH 0, INCREMENT BY 10000) NOT NULL,
"QuoteNoStart" INTEGER GENERATED ALWAYS AS IDENTITY
   (START WITH 0, INCREMENT BY 100000) NOT NULL,
CONSTRAINT "ID" PRIMARY KEY ("ID")
)

CREATE TRIGGER "CreateStores" AFTER INSERT
ON "SalesPerson"
BEGIN
   DECLARE SalesPersonSuffix VARCHAR DEFAULT CAST(NEWROW.ID AS VARCHAR);

   EXECUTE IMMEDIATE 'CREATE STORE "SalesPerson' +
                     SalesPersonSuffix + 'In"
                     AS LOCAL PATH ''c:\mainoffice\salesperson' +
                     SalesPersonSuffix + 'in''';
   EXECUTE IMMEDIATE 'CREATE STORE "SalesPerson' +
                     SalesPersonSuffix + 'Out"
                     AS LOCAL PATH ''c:\mainoffice\salesperson' +
                     SalesPersonSuffix + 'out''';

EXCEPTION
END

CREATE TABLE "Customer"
(
"No" INTEGER GENERATED BY DEFAULT AS IDENTITY
   (START WITH 0, INCREMENT BY 1) NOT NULL,
"Name" VARCHAR(60) COLLATE "ANSI" NOT NULL,
"Address1" VARCHAR(60) COLLATE "ANSI" NOT NULL,
"Address2" VARCHAR(60) COLLATE "ANSI",
"City" VARCHAR(40) COLLATE "ANSI" NOT NULL,
"StateProvince" VARCHAR(40) COLLATE "ANSI" NOT NULL,
"PostalCode" VARCHAR(30) COLLATE "ANSI" NOT NULL,
"Country" VARCHAR(40) COLLATE "ANSI" NOT NULL,
"SalesPersonID" INTEGER NOT NULL,
CONSTRAINT "No" PRIMARY KEY ("No"),
CONSTRAINT "SalesPersonID" FOREIGN KEY ("SalesPersonID")
   REFERENCES "SalesPerson" ("ID")
)

CREATE TABLE "Quotes"
(
"CustomerNo" INTEGER NOT NULL,
"QuoteNo" INTEGER GENERATED BY DEFAULT AS IDENTITY
   (START WITH 0, INCREMENT BY 1) NOT NULL,
"QuoteDate" DATE NOT NULL,
"QuoteTotal" DECIMAL(20,2) DEFAULT 0.00 NOT NULL,
CONSTRAINT "QuoteNo" PRIMARY KEY ("QuoteNo"),
CONSTRAINT "CustomerNo" FOREIGN KEY ("CustomerNo")
   REFERENCES "Customer" ("No")
)

CREATE PROCEDURE "UpdateIdentityRanges" (IN "SalesPersonID" INTEGER)
BEGIN
   DECLARE SalesPersonCursor CURSOR FOR SalesPersonStmt;
   DECLARE CustomerNoStart INTEGER DEFAULT 0;
   DECLARE QuoteNoStart INTEGER DEFAULT 0;

   -- Select the correct salesperson

   PREPARE SalesPersonStmt FROM 'SELECT * FROM SalesPerson WHERE ID = ?';
   OPEN SalesPersonCursor USING SalesPersonID;

   -- Verify that the salesperson was found, and then alter the tables to
   -- ensure the proper seed value for the identity columns

   IF ROWCOUNT(SalesPersonCursor) = 0 THEN
      RAISE ERROR CODE 10000 MESSAGE 'Invalid salesperson ID';
   ELSE
      FETCH FROM SalesPersonCursor (CustomerNoStart) INTO CustomerNoStart;
      FETCH FROM SalesPersonCursor (QuoteNoStart) INTO QuoteNoStart;

      -- Need to make sure to close SalesPerson table completely
      -- because it will have both the Customer and Quotes tables
      -- open due to the foreign key constraints

      CLOSE SalesPersonCursor;
      UNPREPARE SalesPersonStmt;

      EXECUTE IMMEDIATE 'ALTER TABLE Customer
                        ALTER COLUMN No RESTART WITH ' +
                        CAST(CustomerNoStart AS VARCHAR);

      EXECUTE IMMEDIATE 'ALTER TABLE Quotes
                        ALTER COLUMN QuoteNo RESTART WITH ' +
                        CAST(QuoteNoStart AS VARCHAR);
   END IF;

ENDAs you can see, the sample databases consist of three tables:The Customer table contains a foreign key constraint that links each customer to a specific salesperson in the SalesPerson table. The Quotes table contains a foreign key constraint that links each Quote to a specific customer in the Customer table. The constraints will ensure the integrity of the database by preventing any quotes from being entered for non-existent customers. We've only entered data for the salespersons, and will assume that this is a new system with no customers or quotes to start with.
One of the common problems that you run into with replication is how to handle IDENTITY columns that are auto-assigned numbers. You can't use the same range of numbers for each salesperson's copy of the database - doing so would cause primary key violations when the updates are loaded at the main sales office. In this example, we've decided to solve the issue by using a different range of numbers for each salesperson. We're being a little clever in how we're assigning the range of numbers for each salesperson by using IDENTITY columns in the SalesPerson table that increment separately for customer numbers and quote numbers:
"CustomerNoStart" INTEGER GENERATED ALWAYS AS IDENTITY
   (START WITH 0, INCREMENT BY 10000) NOT NULL,
"QuoteNoStart" INTEGER GENERATED ALWAYS AS IDENTITY
   (START WITH 0, INCREMENT BY 100000) NOT NULL,
In our example, 10,000 customer numbers is plenty for each salesperson, as is 100,000 quote numbers. That gives us the possibility of a maximum number of just over 20,000 salespersons without running into issues with overflowing the INTEGER type used for these columns. We will use these numbers to assign the starting IDENTITY column seed values for the Customer and Quotes tables when we first create the database on each salesperson's laptop. To accomplish this, we'll include a stored procedure in the database definition called UpdateIdentityRanges that accepts one parameter, the salesperson ID, and alters the Customer and Quotes tables so that they are using the proper seed values for their IDENTITY columns based upon the salesperson using the ALTER TABLE statement.
You will also notice that we have defined an after-insert trigger for the SalesPerson table using the CREATE TRIGGER statement that will create the necessary inbound and outbound stores for use in distributing updates to and from the salespersons' laptops using two CREATE STORE statements.
We will be using the same database definition at both the main office and on each salesperson's laptop. However, the way each table is replicated will differ depending upon where it is located.
The SalesPerson table will only be replicated from the main sales office's ElevateDB Server to the remote salesperson laptops. It is outside of the scope of this article, but normally you would then make sure that the local user security for the database on each salesperson's laptop would prevent the salesperson from modifying the contents of the SalesPerson table.
The Customer and Quotes tables will be replicated in both directions. In some organizations it might be desired to keep each salesperson's customers and quotes separate so that one salesperson cannot see the other salespersons' data. However, in our case we want to make sure that any salesperson can handle any customer or quote, regardless of which salesperson originated the customer or quote.
To summarize how the replication will take place:
| Table | Direction |
| SalesPerson | To Laptop |
| Customer | To Laptop and From Laptop |
| Quotes | To Laptop and From Laptop |
Setting up the Main Office Database
To set up the database at the main office, we will simply execute the DDL statements (in a script) listed previously for the database definition. However, we also need to set up the database as follows:
1) We need a local store that we can use for transferring a backup of the main sales office database and a local store for saving the update files that we will transfer to and from the salespersons' laptops. We will use the CREATE STORE statement to create two stores, one for the initial setup backup file, and one for storing the update files as they are generated.
2) We then need to add some salespersons to the main sales office database. We will do this by using simple INSERT statements.
3) Finally, we need to backup the database using the BACKUP DATABASE statement and publish the database using the PUBLISH DATABASE statement.
All of this will be done using the following script:
SCRIPT
BEGIN
   DECLARE ConfigCursor CURSOR FOR ConfigStmt;
   DECLARE SalesPersonStmt STATEMENT;

   -- Create necessary stores if not present

   USE Configuration;

   PREPARE ConfigStmt FROM 'SELECT * FROM Stores WHERE Name = ?';
   OPEN ConfigCursor USING 'MainSetup';

   IF ROWCOUNT(ConfigCursor) = 0 THEN
      EXECUTE IMMEDIATE 'CREATE STORE "MainSetup" AS LOCAL
                        PATH ''c:\mainoffice\setup''';
   END IF;

   CLOSE ConfigCursor;
   OPEN ConfigCursor USING 'MainUpdates';

   IF ROWCOUNT(ConfigCursor) = 0 THEN
      EXECUTE IMMEDIATE 'CREATE STORE "MainUpdates" AS LOCAL
                        PATH ''c:\mainoffice\updates''';
   END IF;

   USE MainOffice;

   -- Insert the salesperson rows

   PREPARE SalesPersonStmt FROM 'INSERT INTO "SalesPerson" VALUES (?,?,?,?)';

   EXECUTE SalesPersonStmt USING NULL,'Guy Smiley',NULL,NULL;
   EXECUTE SalesPersonStmt USING NULL,'Tom Sawyer',NULL,NULL;

   -- Be sure to unprepare the statement so that we can publish this table later

   UNPREPARE SalesPersonStmt;

   -- Backup the database so that the laptops can use it for setup

   EXECUTE IMMEDIATE 'BACKUP DATABASE "MainOffice"
                     AS "SetupLaptop"
                     TO STORE "MainSetup"
                     DESCRIPTION ''Laptop setup''
                     INCLUDE CATALOG';

   -- Finally, publish the database

   EXECUTE IMMEDIATE 'PUBLISH DATABASE "MainOffice"';

END
This script is included with the source code for this article as setupmainoffice.sql.
The SalesPerson table now looks like the following:
And there are now six local stores defined at the main sales office:
Setting up the Salesperson Databases
We now need to create a script that can be used to set up each salesperson database when the application is first installed on each laptop. Such a script will need to do the following:
1) Create a local store using the CREATE STORE statement as a destination for the backup file that will be copied from the ElevateDB Server at the main sales office using the COPY FILE statement, and create a remote store that will point to a store at the main sales office that will contain the backup file that we created above.
2) Create the local database for the laptop using the CREATE DATABASE statement, restore the backup file that was copied from the main sales office using the RESTORE DATABASE statement, and then publish the Customer and Quotes tables in the local database using the PUBLISH DATABASE statement.
The script accepts one parameter, the salesperson ID. It is assumed that this ID will be assigned during installation and will not change. The script looks like this:
SCRIPT (IN SalesPersonID INTEGER)
BEGIN
   DECLARE ConfigCursor CURSOR FOR ConfigStmt;
   DECLARE SalesPersonSuffix VARCHAR DEFAULT CAST(SalesPersonID AS VARCHAR);

   USE Configuration;

   -- Create necessary stores if not present

   PREPARE ConfigStmt FROM 'SELECT * FROM Stores WHERE Name = ?';
   OPEN ConfigCursor USING 'LaptopSetup' + SalesPersonSuffix;

   IF ROWCOUNT(ConfigCursor) = 0 THEN
      EXECUTE IMMEDIATE 'CREATE STORE "LaptopSetup' + SalesPersonSuffix +'" AS LOCAL
                        PATH ''c:\laptop' + SalesPersonSuffix + '\setup''';
   END IF;

   CLOSE ConfigCursor;
   OPEN ConfigCursor USING 'MainOfficeSetup';

   IF ROWCOUNT(ConfigCursor) = 0 THEN
      EXECUTE IMMEDIATE 'CREATE STORE "MainOfficeSetup" AS REMOTE
                        ADDRESS ''127.0.0.1'' PORT 12010
                        USER "Administrator"
                        PASSWORD ''EDBDefault''
                        STORE "MainSetup"';
   END IF;

   -- Create necessary database if not present

   PREPARE ConfigStmt FROM 'SELECT * FROM Databases WHERE Name = ?';
   OPEN ConfigCursor USING 'Laptop' + SalesPersonSuffix;

   IF ROWCOUNT(ConfigCursor) = 0 THEN
      EXECUTE IMMEDIATE 'CREATE DATABASE "Laptop' + SalesPersonSuffix +'"
                        PATH ''c:\laptop' + SalesPersonSuffix + '''
                        DESCRIPTION ''Laptop example database''';

      -- Now copy the backup file from the remote store to the local store

      EXECUTE IMMEDIATE 'COPY FILE "SetupLaptop.EDBBkp"
                        IN STORE "MainOfficeSetup"
                        TO "SetupLaptop.EDBBkp"
                        IN STORE "LaptopSetup' + SalesPersonSuffix + '"';

      -- Now we can restore the backup into the database

      EXECUTE IMMEDIATE 'RESTORE DATABASE "Laptop'+ SalesPersonSuffix +'"
                        FROM "SetupLaptop"
                        IN STORE "LaptopSetup' + SalesPersonSuffix + '"
                        INCLUDE CATALOG';

      -- And, finally we can publish the Customer and Quotes tables

      EXECUTE IMMEDIATE 'PUBLISH DATABASE "Laptop' + SalesPersonSuffix +'"
                        TABLES Customer, Quotes';
   END IF;

END
This script is included with the source code for this article as setuplaptop.sql.
There is now one local LaptopSetup store and one remote MainSetup store defined on each salesperson's laptop:
Setting up the Synchronization at the Main Sales Office
Okay, so now we've got the databases set up at the main sales office and on both salesperson laptops. Now we need to set up the synchronization process. We can start with the main sales office, which will need to create a single update file each night and copy this update file to the salesperson-specific stores so that it will be available for the salespersons to copy back to their laptops and apply to their copy of the database. Because we want to create a new update file every night, we will use a job that can be scheduled to run every night at a specific time. This job will need to do the following:
1) Loop through the SalesPerson table and load any update files present in the inbound salesperson store into the main sales office database according to the creation order of the update files. We will use the LOAD UPDATES statement to load the updates.
2) After the saleperson update files are all processed, all updates for the main sales office database are then saved to an update file and copied to all outbound salesperson stores using the SAVE UPDATES statement.
Here is the job in script form, which will make it easier to execute for the purposes of demonstrating the functionality:
SCRIPT
BEGIN
   DECLARE SalesPersonCursor CURSOR FOR SalesPersonStmt;
   DECLARE ConfigCursor CURSOR FOR ConfigStmt;
   DECLARE UpdateCursor CURSOR FOR UpdateStmt;
   DECLARE UpdateFile VARCHAR DEFAULT '';
   DECLARE ID INTEGER DEFAULT 0;
   DECLARE SalesPersonSuffix VARCHAR DEFAULT '';

   -- First we'll load in all of the updates from the salespersons

   USE MainOffice;

   PREPARE SalesPersonStmt FROM 'SELECT * FROM SalesPerson';
   OPEN SalesPersonCursor;

   FETCH FIRST FROM SalesPersonCursor ('ID') INTO ID;

   USE Configuration;

   WHILE NOT EOF(SalesPersonCursor) DO

      SET SalesPersonSuffix = CAST(ID AS VARCHAR);

      -- Find out what update files are available for loading from
      -- this salesperson, being sure to order them by their creation
      -- order

      EXECUTE IMMEDIATE 'SET UPDATES STORE TO "SalesPerson' + SalesPersonSuffix + 'In"';

      PREPARE UpdateStmt FROM 'SELECT * FROM Updates ORDER BY CreatedOn';
      OPEN UpdateCursor;

      FETCH FIRST FROM UpdateCursor ('Name') INTO UpdateFile;

      WHILE NOT EOF(UpdateCursor) DO

         -- Load the update file for the salesperson

         EXECUTE IMMEDIATE 'LOAD UPDATES FOR DATABASE "MainOffice"
                           FROM "' + UpdateFile + '" IN STORE
                           "SalesPerson' + SalesPersonSuffix + 'In"';

         -- Since the load was successful for this update file, go
         -- ahead and delete it now

         EXECUTE IMMEDIATE 'DELETE FILE "' + UpdateFile + '.EDBUpd" FROM STORE
                           "SalesPerson' + SalesPersonSuffix + 'In"';

         FETCH NEXT FROM UpdateCursor ('Name') INTO UpdateFile;

      END WHILE;

      FETCH NEXT FROM SalesPersonCursor ('ID') INTO ID;

   END WHILE;

   -- Now we need to create the main update file to send back to the
   -- the salespersons

   -- Assign main update file name

   SET UpdateFile = 'MainOffice-' + REPLACE(':', '-', CAST(CURRENT_TIMESTAMP AS VARCHAR));

   EXECUTE IMMEDIATE 'SAVE UPDATES FOR DATABASE "MainOffice"
                     AS "' + UpdateFile + '"
                     TO STORE "MainUpdates"';

   FETCH FIRST FROM SalesPersonCursor ('ID') INTO ID;

   WHILE NOT EOF(SalesPersonCursor) DO

      SET SalesPersonSuffix = CAST(ID AS VARCHAR);

      -- Copy the main office update file to each salesperson store

      EXECUTE IMMEDIATE 'COPY FILE "' + UpdateFile + '.EDBUpd" IN STORE
                        "MainUpdates" TO "' + UpdateFile + '.EDBUpd" IN STORE
                        "SalesPerson' + SalesPersonSuffix + 'Out"';

      FETCH NEXT FROM SalesPersonCursor ('ID') INTO ID;

   END WHILE;

END
This script is included with the source code for this article as mainofficejob.sql.
Setting up the Synchronization on each Salesperson Laptop
The next step is to define a script that will actually complete the process of synchronizing each laptop machine with the main sales office. Since each laptop will be controlling the synchronization process, this script will be executed on-demand at the laptop by the salesperson. The steps involved with synchronizing with the main sales office are:
1) Make sure that the stores necessary for the synchronization are defined. There will be both inbound and outbound local stores for storing the inbound and outbound update files, respectively, and both inbound and outbound remote stores that will be used to transfer the local update files to and from the appropriate inbound or outbound salesperson store at the main sales office. We will use the CREATE STORE statement to create any necessary stores.
2) Save any updates to the Customer and Quotes tables in the local laptop database to an update file in the outbound local store using the SAVE UPDATES statement.
3) Loop through the outbound local store and copy any update files to the inbound remote store at the main sales office using the COPY FILE statement. If the copy completes, then delete the update file in the outbound local store using the DELETE FILE statement. This ensures that any update files that did not get copied successfully during the last synchronization will be copied during the current synchronization, and that once an update file is copied successfully it will be deleted so that it no longer needs to be copied.
4) After copying the outbound update files, copy any update files from the outbound remote store at the main sales office into the local inbound store using the COPY FILE statement. If the copy completes, then delete the update file in the outbound remote store using the DELETE FILE statement. Again, this ensures that any update files that did not get copied successfully during the last synchronization will be copied during the current synchronization, and that once an update file is copied successfully it will be deleted so that it no longer needs to be copied.
5) Finally, loop through the inbound local store and load any update files into the local salesperson database using the LOAD UPDATES statement. Once an update file is loaded, delete it from the inbound local store using the DELETE FILE statement.
SCRIPT (IN SalesPersonID INTEGER)
BEGIN
   DECLARE ConfigCursor CURSOR FOR ConfigStmt;
   DECLARE UpdateCursor CURSOR FOR UpdateStmt;
   DECLARE UpdateFile VARCHAR DEFAULT '';
   DECLARE SalesPersonSuffix VARCHAR DEFAULT CAST(SalesPersonID AS VARCHAR);

   USE Configuration;

   -- Create necessary stores if not present

   PREPARE ConfigStmt FROM 'SELECT * FROM Stores WHERE Name = ?';
   OPEN ConfigCursor USING 'LaptopUpdates' + SalesPersonSuffix + 'In';

   IF ROWCOUNT(ConfigCursor) = 0 THEN
      EXECUTE IMMEDIATE 'CREATE STORE "LaptopUpdates' + SalesPersonSuffix + 'In"
                        AS LOCAL PATH ''c:\laptop' + SalesPersonSuffix + '\updatesin''';
   END IF;

   CLOSE ConfigCursor;
   OPEN ConfigCursor USING 'LaptopUpdates' + SalesPersonSuffix + 'Out';

   IF ROWCOUNT(ConfigCursor) = 0 THEN
      EXECUTE IMMEDIATE 'CREATE STORE "LaptopUpdates' + SalesPersonSuffix + 'Out"
                        AS LOCAL PATH ''c:\laptop' + SalesPersonSuffix + '\updatesout''';
   END IF;

   CLOSE ConfigCursor;
   OPEN ConfigCursor USING 'MainOffice' + SalesPersonSuffix + 'In';

   IF ROWCOUNT(ConfigCursor) = 0 THEN
      EXECUTE IMMEDIATE 'CREATE STORE "MainOffice' + SalesPersonSuffix + 'In"
                        AS REMOTE ADDRESS ''127.0.0.1'' PORT 12010
                        USER "Administrator"
                        PASSWORD ''EDBDefault''
                        STORE "SalesPerson' + SalesPersonSuffix + 'In"';
   END IF;

   CLOSE ConfigCursor;
   OPEN ConfigCursor USING 'MainOffice' + SalesPersonSuffix + 'Out';

   IF ROWCOUNT(ConfigCursor) = 0 THEN
      EXECUTE IMMEDIATE 'CREATE STORE "MainOffice' + SalesPersonSuffix + 'Out"
                        AS REMOTE ADDRESS ''127.0.0.1'' PORT 12010
                        USER "Administrator"
                        PASSWORD ''EDBDefault''
                        STORE "SalesPerson' + SalesPersonSuffix + 'Out"';
   END IF;

   -- Save any current updates to the update file

   SET UpdateFile = 'Laptop' + SalesPersonSuffix +
                    '-' + REPLACE(':', '-', CAST(CURRENT_TIMESTAMP AS VARCHAR));

   EXECUTE IMMEDIATE 'SAVE UPDATES FOR DATABASE "Laptop' + SalesPersonSuffix + '"
                     AS "' + UpdateFile + '"
                     TO STORE "LaptopUpdates' + SalesPersonSuffix + 'Out"
                     TABLES Customer, Quotes';

   -- Get a list all of the un-transferred update files and copy
   -- them all into the main office store

   EXECUTE IMMEDIATE 'SET UPDATES STORE TO "LaptopUpdates' + SalesPersonSuffix + 'Out"';

   PREPARE UpdateStmt FROM 'SELECT * FROM Updates ORDER BY CreatedOn';
   OPEN UpdateCursor;

   FETCH FIRST FROM UpdateCursor ('Name') INTO UpdateFile;

   WHILE NOT EOF(UpdateCursor) DO

      -- Copy each update file to the main office store

      EXECUTE IMMEDIATE 'COPY FILE "' + UpdateFile + '.EDBUpd" IN STORE
                        "LaptopUpdates' + SalesPersonSuffix + 'Out" TO "' +
                        UpdateFile + '.EDBUpd" IN STORE
                        "MainOffice' + SalesPersonSuffix + 'In"';

      -- If copied successfully, then delete it

      EXECUTE IMMEDIATE 'DELETE FILE "' + UpdateFile + '.EDBUpd" FROM STORE
                        "LaptopUpdates' + SalesPersonSuffix + 'Out"';

      FETCH NEXT FROM UpdateCursor ('Name') INTO UpdateFile;

   END WHILE;

   -- Get a list all of the update files in the main office store and copy
   -- them to the local store

   EXECUTE IMMEDIATE 'SET UPDATES STORE TO "MainOffice' + SalesPersonSuffix + 'Out"';

   PREPARE UpdateStmt FROM 'SELECT * FROM Updates ORDER BY CreatedOn';
   OPEN UpdateCursor;

   FETCH FIRST FROM UpdateCursor ('Name') INTO UpdateFile;

   WHILE NOT EOF(UpdateCursor) DO

      -- Copy each update file to the local store

      EXECUTE IMMEDIATE 'COPY FILE "' + UpdateFile + '.EDBUpd" IN STORE
                        "MainOffice' + SalesPersonSuffix + 'Out" TO "' +
                        UpdateFile + '.EDBUpd" IN STORE
                        "LaptopUpdates' + SalesPersonSuffix + 'In"';

      -- If copied successfully, then delete it

      EXECUTE IMMEDIATE 'DELETE FILE "' + UpdateFile + '.EDBUpd" FROM STORE
                        "MainOffice' + SalesPersonSuffix + 'Out"';

      FETCH NEXT FROM UpdateCursor ('Name') INTO UpdateFile;

   END WHILE;

   -- Get a list all of the update files in the local store and load them

   EXECUTE IMMEDIATE 'SET UPDATES STORE TO "LaptopUpdates' + SalesPersonSuffix + 'In"';

   PREPARE UpdateStmt FROM 'SELECT * FROM Updates ORDER BY CreatedOn';
   OPEN UpdateCursor;

   FETCH FIRST FROM UpdateCursor ('Name') INTO UpdateFile;

   WHILE NOT EOF(UpdateCursor) DO

      -- Load the updates from the update file

      EXECUTE IMMEDIATE 'LOAD UPDATES FOR DATABASE "Laptop' + SalesPersonSuffix + '"
                        FROM "' + UpdateFile + '" IN STORE
                        "LaptopUpdates' + SalesPersonSuffix + 'In"';

      -- If loaded successfully, then delete it

      EXECUTE IMMEDIATE 'DELETE FILE "' + UpdateFile + '.EDBUpd" FROM STORE
                        "LaptopUpdates' + SalesPersonSuffix + 'In"';

      FETCH NEXT FROM UpdateCursor ('Name') INTO UpdateFile;

   END WHILE;

END
This script is included with the source code for this article as laptopsynch.sql.
After running the synchronization for the first time, the new LaptopUpdatesIn and LaptopUpdatesOut local stores and the new MainOfficeIn and MainOfficeOut remote stores will be created on each laptop:
Testing the System
Okay, so we've got everything set up now for both the salesperson laptops and the main sales office. It's time to test things out to make sure that everything is working. To do this, we'll enter in some customers and quotes for each salesperson to simulate the process of creating quotes. We also need to make sure to set the IDENTITY column ranges for the Customer and Quotes tables so that they match those set in the SalesPerson table. We'll do that by calling the UpdateIdentityRanges stored procedure that is present in every copy of the database for the salespersons before inserting any rows.
The following script can be called with the proper SalesPersonID in order to insert all of the necessary test rows:
SCRIPT (IN SalesPersonID INTEGER)
BEGIN
   DECLARE CustomerStmt STATEMENT;
   DECLARE CustomerNo INTEGER;
   DECLARE QuotesStmt STATEMENT;

   CASE SalesPersonID
   WHEN 1 THEN

      USE Laptop1;

      -- Call the UpdateIdentityRanges procedure

      CALL UpdateIdentityRanges(1);

      -- Prepare the INSERT statements

      PREPARE CustomerStmt FROM 'INSERT INTO Customer VALUES (?,?,?,?,?,?,?,?,?)';
      PREPARE QuotesStmt FROM 'INSERT INTO Quotes VALUES (?,?,?,?)';

      -- Be sure to set the customer # to NULL so that it is assigned
      -- a new value

      SET CustomerNo = NULL;

      EXECUTE CustomerStmt USING CustomerNo,
                                 'Acme Fasteners, Inc.',
                                 '100 Main Street',
                                 NULL,
                                 'Pleasantville',
                                 'NY',
                                 '99999',
                                 'United States',
                                 1;

      EXECUTE QuotesStmt USING CustomerNo,
                               NULL,
                               DATE '2007-05-26',
                               2500;

      SET CustomerNo = NULL;

      EXECUTE CustomerStmt USING CustomerNo,
                                 'Mister Plow, Inc.',
                                 '742 Evergreen Terrace',
                                 NULL,
                                 'Springfield',
                                 'Illinois',
                                 '55555',
                                 'United States',
                                 1;

      EXECUTE QuotesStmt USING CustomerNo,
                               NULL,
                               DATE '2007-06-14',
                               2200;
      EXECUTE QuotesStmt USING CustomerNo,
                               NULL,
                               DATE '2007-01-06',
                               5000;
      EXECUTE QuotesStmt USING CustomerNo,
                               NULL,
                               DATE '2007-03-29',
                               4300;

      SET CustomerNo = NULL;

      EXECUTE CustomerStmt USING CustomerNo,
                                 'Planet Express, Inc.',
                                 '3.14159265 Circle Street',
                                 NULL,
                                 'New New York',
                                 'NY',
                                 '3000',
                                 'United States',
                                 1;

      EXECUTE QuotesStmt USING CustomerNo,
                               NULL,
                               DATE '2007-09-19',
                               3000;
      EXECUTE QuotesStmt USING CustomerNo,
                               NULL,
                               DATE '2007-10-02',
                               9800;
      EXECUTE QuotesStmt USING CustomerNo,
                               NULL,
                               DATE '2007-12-16',
                               3800;
   WHEN 2 THEN

      USE Laptop2;

      -- Call the UpdateIdentityRanges procedure

      CALL UpdateIdentityRanges(2);

      -- Prepare the INSERT statements

      PREPARE CustomerStmt FROM 'INSERT INTO Customer VALUES (?,?,?,?,?,?,?,?,?)';
      PREPARE QuotesStmt FROM 'INSERT INTO Quotes VALUES (?,?,?,?)';

      -- Be sure to set the customer # to NULL so that it is assigned
      -- a new value

      SET CustomerNo = NULL;

      EXECUTE CustomerStmt USING CustomerNo,
                                 'Smith Brothers Machinery, Inc.',
                                 '200 Cherry Street',
                                 NULL,
                                 'Orangeland',
                                 'CA',
                                 '77777',
                                 'United States',
                                 2;

      EXECUTE QuotesStmt USING CustomerNo,
                               NULL,
                               DATE '2007-07-18',
                               12000;
      EXECUTE QuotesStmt USING CustomerNo,
                               NULL,
                               DATE '2007-04-12',
                               6000;

   END CASE;

END
This script is included with the source code for this article as laptopinsert.sql.
We now have updates in both salesperson laptop databases that need to be synchronized with the main sales office database. All we need to do now is run the synchronization script that we created with the proper SalesPersonID and the script will synchronize all of the updates with the ElevateDB Server running at the main sales office.
To test the whole process, let's go through the steps. You can use the ElevateDB Manager to execute all of the scripts included with this article.
1) Make sure that the ElevateDB Server is running locally on the same machine, listening for requests on all addresses (the default) or address 127.0.0.1 and port 12010 (the default). Please see the Starting and Configuring the ElevateDB Server topic in the ElevateDB SQL Manual for more information.
2) Create the main sales office database (MainOffice) by executing the CREATE DATABASE statement (described at the beginning of this article) and then execute the createmaindb.sql script from the context of the MainOffice database to create all of the tables and other database objects.
3) Setup the main sales office database by executing the setupmainoffice.sql script.
4) Setup the laptop database for salesperson 1 (Laptop1) by executing the setuplaptop.sql script with the parameter of 1.
5) Setup the laptop database for salesperson 2 (Laptop2) by executing the setuplaptop.sql script with the parameter of 2.
6) Insert the rows into the Laptop1 database by executing the laptopinsert.sql script with a parameter of 1.
7) Insert the rows into the Laptop2 database by executing the laptopinsert.sql script with a parameter of 2.
8) Synchronize the Laptop1 database by executing the laptopsynch.sql synchronization script with the parameter of 1.
9) Synchronize the Laptop2 database by executing the laptopsynch.sql synchronization script with the parameter of 2.
10) Load the updates into the main sales office database and create the appropriate update files for distribution to the salesperson laptops the next time they synchronize by executing the mainofficejob.sql script.
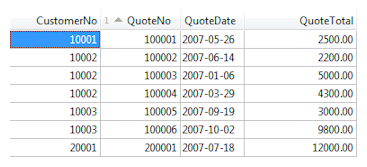
If you look at the main sales office database (MainOffice) at this point, you should see all of the rows from both salesperson laptop databases. Now, if you execute steps 8 and 9 again you will see the full bi-directional replication in action. All three copies of the database (MainOffice, Laptop1, and Laptop2) should now be identical.
Summary
Replication can be an especially complicated task at times, and this technical article should help shed some light on some techniques that are both simple and useful. As always, if you have any questions at all, please feel free to post them in the ElevateDB newsgroup here:
ElevateDB General Support Forum
This will allow everyone to share in any new ideas or comments that you may have regarding this article.
The next technical article will be entitled ".NET Data Provider Tips and Tricks", so look for it soon.
This web page was last updated on Wednesday, January 13, 2021 at 12:15 AM | Privacy Policy © 2024 Elevate Software, Inc. All Rights Reserved Questions or comments ? |
