 | Products |
| Home » Technical Support » ElevateDB Technical Support » Technical Articles » Building a Windows CE Application with Lazarus and ElevateDB |
Published on Thu, Mar 26 2009
Many Delphi applications today could leverage the usage of PDAs and Smartphones running Windows CE/Mobile, and benefit immensely from being able to use these devices as an extension of the main application. Applications such as real estate listing applications, household budgeting and planning applications, and many others are a natural fit for allowing users to move data back and forth between a main repositorsimply have the entire application reside on the mobile device. There is only one problem with this scenario: CodeGear does not currently ship a Delphi compiler for Windows CE/Mobile. This is where Lazarus comes into the picture. Lazarus is an open-source (GPL) emulation of the Delphi IDE and VCL class libraries that uses the open-source Free Pascal compiler to create applications capable of running under Linux, Unix, Windows, Windows CE/Mobile, Mac, and several others. ElevateDB supports Lazarus under Windows (32-bit) and Windows CE/Mobile, so that means that you can write a native Windows CE/Mobile application using Lazarus and ElevateDB. So, let's give it a try!
You can find out more information about Lazarus, as well as download the latest 0.926 version here:
Lazarus
Creating the Database
Let's get started with a description of the application that we'll be writing. It's always nice when a demonstration application actually does something useful, so we decided that a good candidate would be a shopping list application that helps you prepare shopping lists for the grocery store. To get started, let's first define the database structure.
The general idea here is to allow for multiple shopping lists with as many items as necessary. Additionally, it would be nice to have a table that contains the areas in the store where items reside so that we can order the shopping lists in an order that matches the layout of the store. Finally, we'll need a settings table to maintain a reference to the current shopping list. One could easily use an .ini file or something similar for this, but we're database people and so we use tables for everything.
CREATE TABLE "Lists"
(
"Name" VARCHAR(60) COLLATE "UNI_CI" NOT NULL,
"TotalCompleted" INTEGER DEFAULT 0  NOT NULL,
"Total" DECIMAL(20,2) DEFAULT 0.00  NOT NULL
)
DESCRIPTION 'Contains the basic shopping list information'

CREATE TABLE "ListItems"
(
"ListName" VARCHAR(60) COLLATE "UNI_CI" NOT NULL,
"ItemName" VARCHAR(40) COLLATE "UNI_CI" NOT NULL,
"PreferredBrand" VARCHAR(30) COLLATE "UNI_CI",
"AreaName" VARCHAR(30) COLLATE "UNI_CI" NOT NULL,
"ShoppingOrder" INTEGER DEFAULT 0  NOT NULL,
"Quantity" DECIMAL(20,2) DEFAULT 0  NOT NULL,
"UnitPrice" DECIMAL(20,2) DEFAULT 0.00  NOT NULL,
"ExtendedPrice" DECIMAL(20,2) COMPUTED ALWAYS AS Quantity*UnitPrice,
"Completed" BOOLEAN DEFAULT False  NOT NULL
)
DESCRIPTION 'Contains the actual items on a shopping list'


CREATE INDEX "ShoppingOrder" ON "ListItems"
("ListName" COLLATE "UNI_CI", "ShoppingOrder")
DESCRIPTION 'Used to shop for a list by area ordering';

CREATE TABLE "Areas"
(
"Name" VARCHAR(30) COLLATE "UNI_CI" NOT NULL,
"Description" CLOB COLLATE "UNI_CI",
"ShoppingOrder" INTEGER DEFAULT 0  NOT NULL
)
DESCRIPTION 'Contains all areas used for grouping list items together'

CREATE TABLE "Settings"
(
"ListName" VARCHAR(60) COLLATE "UNI_CI"
)
DESCRIPTION 'Contains the current list name'

ALTER TABLE "Lists"
ADD CONSTRAINT "Name" PRIMARY KEY ("Name");

ALTER TABLE "ListItems"
ADD CONSTRAINT "ListName_ItemName" PRIMARY KEY ("ListName", "ItemName");

ALTER TABLE "Areas"
ADD CONSTRAINT "Name" PRIMARY KEY ("Name"),
ADD CONSTRAINT "ShoppingOrder" UNIQUE ("ShoppingOrder");

ALTER TABLE "ListItems"
ADD CONSTRAINT "ListName" FOREIGN KEY ("ListName")
REFERENCES "Lists" ("Name") ON UPDATE NO ACTION ON DELETE NO ACTION,
ADD CONSTRAINT "AreaName" FOREIGN KEY ("AreaName")
REFERENCES "Areas" ("Name") ON UPDATE NO ACTION ON DELETE NO ACTION;

ALTER TABLE "Settings"
ADD CONSTRAINT "ListName" FOREIGN KEY ("ListName")
REFERENCES "Lists" ("Name") ON UPDATE NO ACTION ON DELETE NO ACTION;As you can see, the shopping database consists of four tables:
1) Lists
2) ListItems
3) Areas
4) Settings
Primary and foreign keys are used to enforce referential integrity since we don't want any list items without a corresponding list, and likewise for the shopping areas.
You'll also notice that we use a Unicode collation for all VARCHAR and CLOB columns. This is because Windows CE/Mobile is 100% Uniocde all of the time, so our database will also be 100% Unicode and our application will be compiled using the Unicode version of ElevateDB.
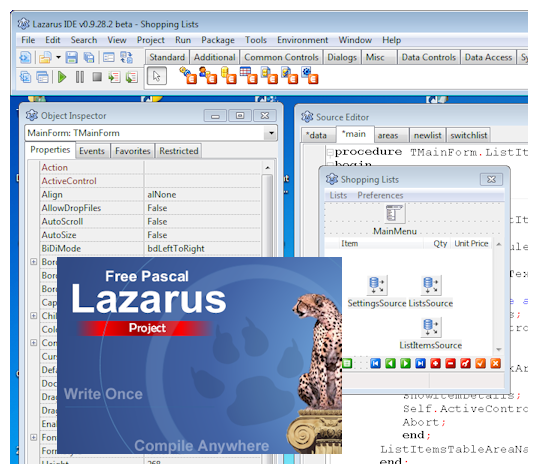
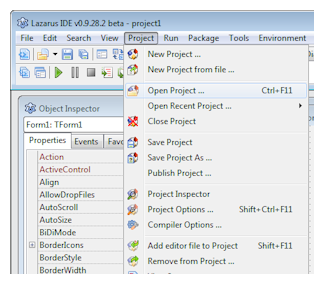
Creating the Application
 Now that we have our database defined, we can now proceed with creating the application. We'll be using Lazarus 0.926 for this application, and we will start by creating a new application project in the IDE. After we have our empty project, we now need to create a data module that will contain the database components and the code necessary to make sure that the database is set up properly.
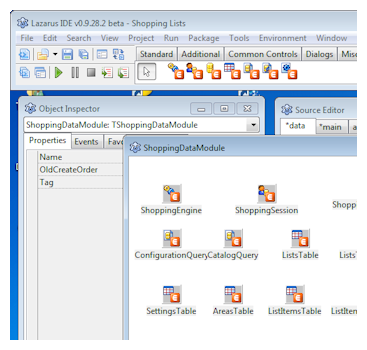
As you can see from examining the source code to the project, the data module is responsible for configuring the database components and creating the database if it does not already exist. This is accomplished in the DataModuleCreate event handler for the data module, and here is a portion of the relevant code:
{ TShoppingDataModule }

procedure TShoppingDataModule.DataModuleCreate(Sender: TObject);
begin
   { Activate the engine.  The engine can also be referenced by the generic
     Engine variable in the edbcomps unit }
   ShoppingEngine.Active:=True;
   { Now connect the session }
   ShoppingSession.Connected:=True;
   { Check to see if the database exists or whether it needs to be
     created }
   with ConfigurationQuery do
      begin
      SQL.Text:='SELECT * FROM Databases WHERE Name='+
        Engine.QuotedSQLStr('Shopping');
      Open;
      if (RecordCount=0) then
         begin
         { Database doesn't exist and we need to create it }
         Close;
         SQL.Text:='CREATE DATABASE "Shopping" PATH '+
           Engine.QuotedSQLStr(ExtractFilePath(Application.ExeName)+'data');
         ExecSQL;
         end
      else
         Close;
      end;
   { Now we can open the Shopping database and start to check the metadata for
     the database.  If anything is missing, we create it now in the proper order
     so as to respect any foreign key <--> primary key RI relationships.

     NOTE the use of doubled-up single quotes when embedding string constants in
     the SQL. }
   with CatalogQuery do
      begin
      SQL.Text:='SELECT * FROM Information.Tables WHERE Name=''Areas''';
      Open;
      if (RecordCount=0) then
         begin
         Close;
         SQL.Clear;
         SQL.Add('CREATE TABLE "Areas"');
         SQL.Add('(');
         SQL.Add('"Name" VARCHAR(30) COLLATE "UNI_CI" NOT NULL,');
         SQL.Add('"Description" CLOB COLLATE "UNI_CI",');
         SQL.Add('"ShoppingOrder" INTEGER DEFAULT 0  NOT NULL,');
         SQL.Add('CONSTRAINT "Name" PRIMARY KEY ("Name"),');
         SQL.Add('CONSTRAINT "ShoppingOrder" UNIQUE ("ShoppingOrder")');
         SQL.Add(')');
         SQL.Add('DESCRIPTION ''Contains all areas used for '+
                 'grouping list items together''');
         ExecSQL;
         end
      else
         Close;
Designing the application in this manner allows us to produce an application that can be copied into a folder on the Windows CE device and launched immediately without any other configuration required. The application is essentially self-configuring.
Creating the Main Interface
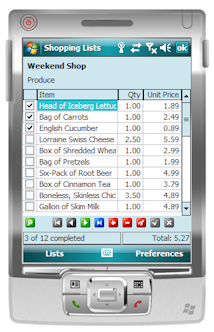 The general design goal with the main interface was that the interface should be simple and easy to use and allow someone to immediately be productive. With that in mind, a data-aware TDBGrid component was used for holding the shopping list items. We want the grid to display the shopping list items in the order defined by which area each item can be found in, and we also want the user to see the name of the area as they move from item to item. The following image shows the main interface.
As you can see, the grid view allows the user to check off items as they are purchased, as well as modify the quantity and unit price as needed. As the user checks off items, the status bar at the bottom of the main interface records the number of items completed, as well as the total price of the items completed.
In addition to the grid view, we needed a more detailed view of each item that would allow the user to do more, including adding new items. What kind of shopping list doesn't allow someone to add new list items? So, with that in mind, we allow the user to click on the magnifying glass icon in the bottom left-hand corner of the interface to switch to the detailed view of the current list item shown below.
The detail view allows the user to define additional attributes such as the area where the item can be found as well as the brand of the item. It also shows the extended price of the item. The user can click on the grid icon in the bottom left-hand corner of the interface to switch back to the grid view of the list.
All of the controls used are data-aware controls except for the navigator (First, Prior, Next, Last, etc.). The navigator uses individual buttons, and the updating of the buttons is handled in response to data source events. A regular TDBNavigator was not used due to some issues with the it working properly during inserts and edits.
The Areas Lookup Table
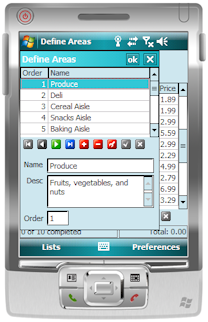 We also needed a way to allow the user to add, edit, and delete the various areas used to group items by the area of the store in which they are found. We did this by adding a separate dialog, as shown below. The areas lookup table dialog is accessible from the main menu via the Preferences menu item on the right.
The Order column specifies the order in which the areas are found in the store where the user shops. Since this is just an example, we decided not to make this aspect any more complex than it is, but one could expand upon this idea and allow the user to define various stores, and then define the areas for each store separately.
All of the area controls are data-aware controls except, again, for the navigator. In fact, if we were able to use the TDBNavigator control for this dialog, the only code for the dialog would be changing the active index order for the areas table.
Managing the Shopping Lists
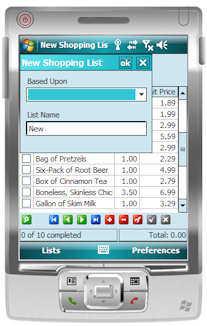 We use main menu items to give the user the ability to add new shopping lists, or to switch to a different list.
A new list can be based upon an existing list, which is nice when you want to keep an existing list but also start a new one without re-typing all of the list items. Switching lists is equally as easy, and involves simply selecting the new list that you wish to use. As mentioned above, the current shopping list name is stored in the settings table.
Compiling and Installing the Application
 1) Download the project contents using the link below and unzip the container .zip file into the folder of your choosing, making sure to preserve the relative folder structure of the .zip file contents.
2) In order to compile the project, simply open the shoplist.lpi project in the Lazarus IDE, select Run and then Build.
3) In the device emulator, make sure that the shared folder (used as the Storage Card) has been set by following these steps:
- From the emulator main menu, open the File menu and select the Configure option
- On the first General page of the Emulator properties window, make sure that the Shared Folder value is set to a valid folder, and make a note of the folder name.
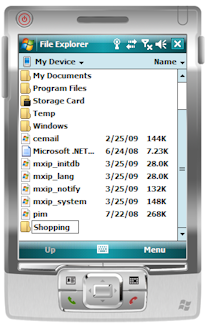 4) In the device emulator, use the File Explorer to create a new folder off the root My Device called "Shopping", and underneath it another folder called "data".
5) Create the same folder structure (Shopping\Data) off the Storage Card folder.
6) Using the Windows Explorer, copy the shoplist.exe file and the contents of the "Data" folder from the installation folder to the shared folder configured in Step 3 using the device emulator.
7) In the device emulator, copy the contents of the Storage Card\Shopping folder (including the Data sub-folder) into the My Device\Shopping folder. The reason that we don't run the application directly in the Storage Card\Shopping folder is due to the fact that the ElevateDB locking does not work correctly in the device emulator when the database is located in a Storage Card shared folder.
8) In the device emulator, launch the application by clicking on the My Device\Shopping\shoplist.exe file in the File Explorer.
Summary
Using Lazarus to build Windows CE/Mobile applications does require a bit of patience for the seasoned Delphi/C++Builder/Visual Studio developer that is used to a more polished environment. However, the end results are very much worth the effort, and the Lazarus team is making fantastic progress on the IDE and the Windows CE/Mobile support. The performance of Lazarus Windows CE applications is very good, and definitely better than an equivalent .NET Compact Framework application. The Windows CE/Mobile environment is very restrictive compared to a normal Windows installation, so any development is more difficult than normal, especially in the area of the user interface.
Hopefully we've been able to give you a little better understanding of one of the many powerful things that you can accomplish using ElevateDB. As always, if you have any questions at all, please feel free to post them in the ElevateDB newsgroup here:
ElevateDB General Support Forum
This will allow everyone to share in any new ideas or comments that you may have regarding this article.
The next article that we'll be doing will be entitled "Connections, Disconnections, and Reconnections", so look for it soon.
This web page was last updated on Wednesday, January 13, 2021 at 12:15 AM | Privacy Policy © 2025 Elevate Software, Inc. All Rights Reserved Questions or comments ? |
