 | Products |
| Home » Technical Support » ElevateDB Technical Support » Product Manuals » ElevateDB Version 2 SQL Manual » Getting Started » Starting and Configuring the ElevateDB Server |
ElevateDB comes with a version of the ElevateDB Server called edbsrvr.exe for Windows and a command-line version of the ElevateDB Server called edbsrvr for Linux. The ElevateDB Server for Windows can be run as a normal application (with a GUI) or as a service. The ElevateDB Server for Linux can be run as a normal command-line application or as a service/daemon.
If running the ElevateDB Server as a normal application there is nothing else to do besides start up the ElevateDB Server from the directory in which the ElevateDB Server binary is located. You can find the ElevateDB Server binaries in the \servers\edbsrvr sub-directory under the main installation directory. There are separate subdirectories for 32-bit Windows, 64-bit Windows, and 64-bit Linux binaries.
 Before starting, please make note of the fact that there are two types of "configuration" files being discussed here. The first is the ElevateDB Server configuration file (EDBConfig.EDBCfg, by default). This file contains system-wide user, role, database, store, and job definitions and is used by the ElevateDB engine in all modes of operation. The second is the edbsrvr.ini file (Windows) or edbsrvr.cnf file (Linux), which is used to store the configuration of the ElevateDB Server itself.
Installing the ElevateDB Server as a Windows Service
If you wish to run the ElevateDB Server as a Windows service you must install it as a service by running the ElevateDB Server with the /install command-line switch set. For example, to install the ElevateDB Server as a service using the Run command window under Windows you would specify the following command:
To uninstall the ElevateDB Server as a Windows service you must run the ElevateDB Server with the /uninstall command-line switch set. For example, to uninstall the ElevateDB Server as a service using the Run command window under Windows you would specify the following command:
Finally, by default the service will display a "Service installed" dialog box when the service is installed successfully. This is sometimes not desired during installations, and in these cases you can use the /silent command-line switch to suppress the dialog box:
Installing the ElevateDB Server as a Linux Service
If you wish to run the ElevateDB Server as a Linux service you must install it as a service so that it can be managed by the systemd service manager. This can be accomplished by completing the following steps:
1. Copy the edbsrvr binary from the installation directory:
to the following target Linux system's binaries directory:
2. Create the systemd service file for the ElevateDB Server by using the following commands from a terminal window:
Copy and paste the following information into the edbsrvr.service file being edited:
Save the service file using Ctrl-S and exit the gedit text editor.
3. Reload the service configurations for systemd using the following command in the terminal window:
4. Enable the service so that it will be loaded at boot time:
Starting the ElevateDB Server
The main difference between starting the ElevateDB Server as a normal application and starting the ElevateDB Server as a service is that the normal application can be started just like any other application while the service must be started using the operating-system-specific methods for doing so.
Starting the ElevateDB Server as a Normal Application Under Windows
You can start and configure the ElevateDB Server as a normal application by completing the following steps.
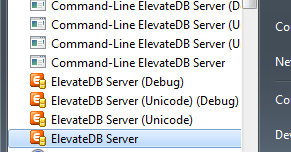
1. Start the ElevateDB Server (edbsrvr.exe) by clicking on the ElevateDB Server link in the Start menu.
2. Make sure that the server is using the desired character set and configuration file folder (C:\Tutorial).
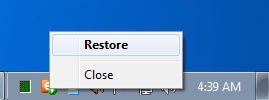
a. In the system tray, right-click on the ElevateDB Server icon to bring up the server menu, and click on the Restore option on the server menu.
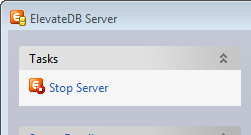
b. In the Tasks pane, click on the Stop Server link.
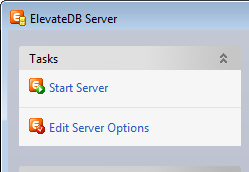
c. In the Tasks pane, click on the Edit Server Options link.
d. On the Server page, make sure that the Character Set is set to the desired value - either ANSI or Unicode.

If you're not sure which character set to select and this is the first time using the ElevateDB Server, then leave the character set at the default of Unicode.
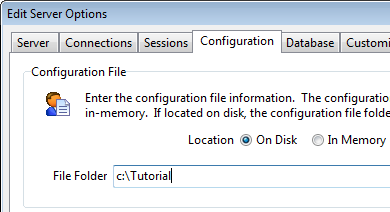
e. On the Configuration page, make sure that the Configuration File - File Folder is set to the desired folder for the ElevateDB Server configuration file (EDBConfig.EDBCfg).
f. Click on the OK button.
g. In the Tasks pane, click on the Start Server link.

e. Click on the close button in the upper-right-hand corner of the ElevateDB Server window to close the server window.
Starting the ElevateDB Server as a Normal Application Under Linux
You can start and configure the command-line ElevateDB Server as a normal application by completing the following steps.
1. Make sure that the ElevateDB Server command-line server binary (edbsrvr) for Linux is copied into the desired location on the target system.
2. Create the edbsrvr.cnf configuration information file using the following commands from a terminal window:
Copy and paste the following information into the edbsrvr.cnf file being edited:
Save the file using Ctrl-S and exit the gedit text editor.
Be sure to modify the Configuration Folder item so that it points to the desired location for the ElevateDB configuration file (EDBConfig.EDBCfg). Please see the Configuration Reference section below for more information on the various settings in the edbsrvr.cnf file.
3. Execute the ElevateDB Server binary using the following commands from a terminal window:
where <Target Location> is the location where the ElevateDB Server binary was copied in step 1.
Starting the ElevateDB Server as a Windows Service
To start the ElevateDB Server as a Windows service, you can use the following command from the command-line:
In order to start the ElevateDB Server as a Windows service, the ElevateDB Server must have already been installed as a service using the steps in the Installing the ElevateDB Server as a Windows Service section above.
Starting the ElevateDB Server as a Linux Service
To start the ElevateDB Server as a Linux service, you can use the following commmands from a terminal window:
In order to start the ElevateDB Server as a Linux service, the ElevateDB Server must have already been installed as a service using the steps in the Installing the ElevateDB Server as a Linux Service section above.
Configuration Reference
On Windows, the ElevateDB Server stores its configuration information in an .ini file that is, by default, located in the following directory:
On Linux, the ElevateDB Server stores its configuration information in a .cnf file that is, by default, located in the following directory:
The name of the .ini or .cnf configuration file is determined by the name of the binary. For example, for the edbsrvr.exe Windows binary, the name of the .ini file would be edbsrvr.ini, and for the edbsrvr Linux binary, the name of the .cnf file would be edbsrvr.cnf.
As of the 2.09 release of ElevateDB, if the ElevateDB Server finds an .ini or .cnf file with the proper name in the same directory as the ElevateDB Server binary, it will use it instead of the .ini or .cnf file in the above directories.
All of the configuration entries in the ElevateDB Server .ini or .cnf configuration files are stored under a section called "Server" (see below for how multiple server instances can change this). Each of the individual configuration entries in this section are as follows:
Multiple Server Instances
Multiple instances of the ElevateDB Server can be run on the same physical machine through named server instances. Named server instances are simply instances of the ElevateDB Server that were executed using two special command-line switches:
Named server instances use the passed name and description to provide the name of the ElevateDB Server instance, as well as the description. The name parameter is also used to determine which section of the edbsrvr.ini (Windows) or edbsrvr.cnf (Linux) file is used for configuration purposes. Instead of just the normal "Server" section being used, the section is named using the provided server name. For example, if the named server instance is called "MyServer", then the section where the configuration is stored will be the following:
The description parameter, if also specified, is immediately written to the named server instance section. All other configuration options described above in the Configuration Reference must be modified by running the ElevateDB Server as a normal application on Windows and using the Edit Server Options in the ElevateDB Server's user interface. You can run the ElevateDB Server as a normal application on Windows in order to modify the configuration of a named server instance. For example, to modify the MyServer configuration you would use the following from the command-line:
In order to use a named server instance as a Windows service, the /name parameter must be specified during the installation of the service. For example, if the named server instance is called "MyServer", then the service installation would be accomplished using the following from the command-line:
When you want to start the named server instance as a Windows service, you would simply just use the following from the command-line:
The following example shows how you would install two ElevateDB Server named server instances as Windows services, and then start them:
 You will need to verify that the port being used by each named server instance is unique, or one or more named server instance will not start due to a port conflict. As mentioned above, you can use the ElevateDB Server run as a normal application to modify the configuration of any named server instance.
If running the ElevateDB Server as a normal application there is nothing else to do besides start up the ElevateDB Server from the directory in which the ElevateDB Server binary is located. You can find the ElevateDB Server binaries in the \servers\edbsrvr sub-directory under the main installation directory. There are separate subdirectories for 32-bit Windows, 64-bit Windows, and 64-bit Linux binaries.
Installing the ElevateDB Server as a Windows Service
If you wish to run the ElevateDB Server as a Windows service you must install it as a service by running the ElevateDB Server with the /install command-line switch set. For example, to install the ElevateDB Server as a service using the Run command window under Windows you would specify the following command:
edbsrvr.exe /install
To uninstall the ElevateDB Server as a Windows service you must run the ElevateDB Server with the /uninstall command-line switch set. For example, to uninstall the ElevateDB Server as a service using the Run command window under Windows you would specify the following command:
edbsrvr.exe /uninstall
Finally, by default the service will display a "Service installed" dialog box when the service is installed successfully. This is sometimes not desired during installations, and in these cases you can use the /silent command-line switch to suppress the dialog box:
edbsrvr.exe /install /silent
Installing the ElevateDB Server as a Linux Service
If you wish to run the ElevateDB Server as a Linux service you must install it as a service so that it can be managed by the systemd service manager. This can be accomplished by completing the following steps:
1. Copy the edbsrvr binary from the installation directory:
<InstallDir>\servers\edbsrvr\linux64
to the following target Linux system's binaries directory:
/usr/sbin
2. Create the systemd service file for the ElevateDB Server by using the following commands from a terminal window:
cd /etc/systemd/system

sudo gedit edbsrvr.service
Copy and paste the following information into the edbsrvr.service file being edited:
[Unit]
Description=ElevateDB Server

[Service]
Type=forking
ExecStart=/usr/sbin/edbsrvr

[Install]
WantedBy=multi-user.target
Save the service file using Ctrl-S and exit the gedit text editor.
3. Reload the service configurations for systemd using the following command in the terminal window:
sudo systemctl daemon-reload
4. Enable the service so that it will be loaded at boot time:
sudo systemctl enable edbsrvr
Starting the ElevateDB Server
The main difference between starting the ElevateDB Server as a normal application and starting the ElevateDB Server as a service is that the normal application can be started just like any other application while the service must be started using the operating-system-specific methods for doing so.
Starting the ElevateDB Server as a Normal Application Under Windows
You can start and configure the ElevateDB Server as a normal application by completing the following steps.
1. Start the ElevateDB Server (edbsrvr.exe) by clicking on the ElevateDB Server link in the Start menu.
2. Make sure that the server is using the desired character set and configuration file folder (C:\Tutorial).
a. In the system tray, right-click on the ElevateDB Server icon to bring up the server menu, and click on the Restore option on the server menu.
b. In the Tasks pane, click on the Stop Server link.
c. In the Tasks pane, click on the Edit Server Options link.
d. On the Server page, make sure that the Character Set is set to the desired value - either ANSI or Unicode.
e. On the Configuration page, make sure that the Configuration File - File Folder is set to the desired folder for the ElevateDB Server configuration file (EDBConfig.EDBCfg).
f. Click on the OK button.
g. In the Tasks pane, click on the Start Server link.
e. Click on the close button in the upper-right-hand corner of the ElevateDB Server window to close the server window.
Starting the ElevateDB Server as a Normal Application Under Linux
You can start and configure the command-line ElevateDB Server as a normal application by completing the following steps.
1. Make sure that the ElevateDB Server command-line server binary (edbsrvr) for Linux is copied into the desired location on the target system.
2. Create the edbsrvr.cnf configuration information file using the following commands from a terminal window:
cd /etc

mkdir elevate

cd elevate

mkdir edbsrvr

cd edbsrvr

sudo gedit edbsrvr.cnf
Copy and paste the following information into the edbsrvr.cnf file being edited:
[Server]
Configuration Folder=<Configuration File Location>
Configuration Name=EDBConfig
Maximum Log File Size=1048576
Log Information Events=0
Log Warning Events=1
Log Error Events=1
Catalog Name=EDBDatabase
Configuration File Extension=.EDBCfg
Lock Files Extension=.EDBLck
Log File Extension=.EDBLog
Backup Files Extension=.EDBBkp
Catalog Files Extension=.EDBCat
Table Files Extension=.EDBTbl
Table Index Files Extension=.EDBIdx
Table BLOB Files Extension=.EDBBlb
Temporary Tables Folder=/tmp
Server Name=EDBSrvr
Server Description=ElevateDB Server
Server Run Jobs=1
Server Job Category=
Server Job Retries=10
Server Address=
Server Port=12010
Server Thread Cache Size=128
Server Encrypted Only=0
Server Session Timeout=60
Server Dead Session Interval=30
Server Dead Session Expiration=30
Server Maximum Dead Sessions=64
Server Authorized Addresses=*<#CR#><#LF#>
Server Blocked Addresses=<#CR#><#LF#><#CR#><#LF#>
Update Files Extension=.EDBUpd
Table Publish Files Extension=.EDBPbl
Signature=edb_signature
Licensed Sessions=4096
Encryption Password=elevatesoft
Configuration In Memory=0
Show User Passwords=0
Character Set=0
Show Database Catalog Information=1
Server Encryption Password=elevatesoft
Cache Modules=1
Preload Modules=1
Buffered File IO=0
Buffered File IO Settings=
Buffered File IO Flush Check Interval=60
Trace=0
Trace File Name=edbtrace.log
Auto-Increment Trace File Name=1
Max Trace File Size=134217728
Max Auto-Increment Trace File Name=64
Save the file using Ctrl-S and exit the gedit text editor.
3. Execute the ElevateDB Server binary using the following commands from a terminal window:
cd <Target Location>

./edbsrvr
where <Target Location> is the location where the ElevateDB Server binary was copied in step 1.
Starting the ElevateDB Server as a Windows Service
To start the ElevateDB Server as a Windows service, you can use the following command from the command-line:
net start edbsrvr
Starting the ElevateDB Server as a Linux Service
To start the ElevateDB Server as a Linux service, you can use the following commmands from a terminal window:
net start edbsrvr
Configuration Reference
On Windows, the ElevateDB Server stores its configuration information in an .ini file that is, by default, located in the following directory:
C:\ProgramData\Elevate Software\ElevateDB Server
On Linux, the ElevateDB Server stores its configuration information in a .cnf file that is, by default, located in the following directory:
/etc/elevate/edbsrvr
The name of the .ini or .cnf configuration file is determined by the name of the binary. For example, for the edbsrvr.exe Windows binary, the name of the .ini file would be edbsrvr.ini, and for the edbsrvr Linux binary, the name of the .cnf file would be edbsrvr.cnf.
All of the configuration entries in the ElevateDB Server .ini or .cnf configuration files are stored under a section called "Server" (see below for how multiple server instances can change this). Each of the individual configuration entries in this section are as follows:
| Configuration Entry | Description |
| Encryption Password | Specifies the encryption password used by the ElevateDB Server for all file encryption purposes. The ElevateDB Server uses this password for all configuration file, database catalog, and table files encryption (for encrypted tables). ElevateDB uses the Blowfish block cipher encryption algorithm with 128-bit MD5 hash keys for encryption. Please see the Encryption topic for more information. |
| Signature | Specifies the signature used by the ElevateDB Server for all communications and database access. The ElevateDB Server uses this signature for all configuration file access, table files access, and for all communications with a remote session. A signature is useful for "branding" a server so that it only communicates with sessions that are using a specific signature, rejecting any that do not use that signature. The default value is 'edb_signature'. |
| Licensed Sessions | Specifies that a certain maximum number of concurrent licensed sessions be allowed. The default value is 4096 sessions. Specifying a lower figure will allow no more than the specified number of sessions to concurrently access the same configuration. |
| Character Set | Specifies the character set to use for the ElevateDB Server. The valid values are 0 for the ANSI character set, or 1 for the Unicode character set. If the ElevateDB Server is accessing an existing configuration file and the specified character set does not match the character set of the configuration file, then an error message will be displayed and/or logged when the ElevateDB Server is started. The default is 0 (ANSI) under Linux and 1 (Unicode) under Windows. |
| Configuration Folder | Specifies the path where the ElevateDB Server should look for the configuration file. The configuration file is used to store the information in the Configuration Database in ElevateDB. If the path specified does not exist, then an error will be raised when the ElevateDB Server is started. If the path exists, but the configuration file does not exist in the path, then the ElevateDB Server will create the configuration file as necessary. The default value is the current folder where the server application is running. |
| Configuration In Memory | Specifies that the configuration file will be "virtual" for all sessions in the ElevateDB Server, and reside only in the process's memory. The default value is 0 (False). |
| Configuration Name | Specifies the root name (without extension) used by the ElevateDB Server for the configuration file. The extension used for the configuration file is determined by the "Configuration File Extension" configuration entry (below). The location of the configuration file is determined by the "Configuration Folder" configuration entry (above). The default value is 'EDBConfig'. |
| Configuration File Extension | Specifies the extension to be used for the configuration file. The default value is '.EDBCfg'. |
| Lock Files Extension | Specifies the extension to be used for the configuration and catalog lock files. The default value is '.EDBLck'. |
| Log File Extension | Specifies the extension to be used for the log file. The default value is '.EDBLog'. |
| Maximum Log File Size | Specifies the maximum log file size. The default value is 1048576 bytes. |
| Log Information Events | Specifies that information events should be logged in the log file. The default value is 1 (True). |
| Log Warning Events | Specifies that warning events should be logged in the log file. The default value is 1 (True). |
| Log Error Events | Specifies that error events should be logged in the log file. The default value is 1 (True). |
| Catalog Name | Specifies the root name (without extension) used by the ElevateDB Server for all database catalog files. The extension used for the catalog files is determined by the "Catalog Files Extension" configuration entry (below). The location of the catalog file is determined by the path designated for the applicable database when the database was created. Please see the CREATE DATABASE topic for more information. The default value is 'EDBDatabase'. |
| Catalog Files Extension | Specifies the extension to be used for database catalog files. The default value is '.EDBCat'. |
| Backup Files Extension | Specifies the extension to be used for database backup files. The default value is '.EDBBkp'. |
| Update Files Extension | Specifies the extension to be used for database update files. The default value is '.EDBUpd'. Update files are used to store logged updates for the purposes of synchronizing two different copies of the same database. |
| Table Files Extension | Specifies the extension to be used for database table files. The default value is '.EDBTbl'. |
| Table Index Files Extension | Specifies the extension to be used for database table index files. The default value is '.EDBIdx'. |
| Table BLOB Files Extension | Specifies the extension to be used for database table BLOB files. The default value is '.EDBBlb'. |
| Table Publish Files Extension | Specifies the extension to be used for database table publish files. The default value is '.EDBPbl'. Publish files are used to store the logged updates for a table. |
| Temporary Tables Folder | Specifies where the ElevateDB Server creates any temporary tables that are required for storing query result sets. The default value is the user-specific temporary tables path for the operating system. |
| Show User Passwords | Specifies whether the server will include user passwords when populating the Users system information table. The default value is 1 (True). |
| Show Database Catalog Information | Specifies whether the server will include database catalog character set and version information when populating the Databases system information table. The default value is 1 (True). |
| Cache Modules | Specifies whether the server will load external modules once into memory per session and cache them until the session is closed. Setting this configuration entry to 1 (True) can result in significant performance improvements. This is especially true for configurations with many different external modules. The default value is 0 (False). This setting is superceded by the Preload Modules setting (below), which controls whether the server preloads all external modules associated with the active configuration when the server starts. |
| Preload Modules | Specifies whether all external modules associated with the active configuration will be loaded once into memory at server start and remain cached there until the server is stopped. Setting this configuration entry to 1 (True) can result in significant performance improvements. This is especially true for configurations with many different external modules. The default value is 0 (False). This setting supercedes the Cache Modules setting (above), which controls how external modules are cached at a session level. |
| Buffered File IO | Specifies whether buffered file I/O should be enabled. The default value is 0 (False). Please see the Buffering and Caching topic for more information on buffered file I/O in ElevateDB. |
| Buffered File IO Settings | Specifies the buffered file I/O settings for various file specifications. Each setting is a comma-delimited list of values that make up the buffer settings: the file specification, enclosed in double-quotes (") (String), the block size, in KB (Integer), the buffer size, in MB (Integer), the flush age, in seconds (Integer), and a flush to disk flag (Boolean). Please see the Buffering and Caching topic for more information on each of these settings and their default values. |
| Buffered File IO Flush Check Interval | If buffered file I/O is enabled, specifies how often ElevateDB will check buffered files to see if there are any dirty buffers that need to be written. The default value is 60 seconds. Please see the Buffering and Caching topic for more information on how the buffered file I/O flush check interval works. |
| Server Name | Identifies the ElevateDB Server to external clients once they have connected to the ElevateDB Server. The default value is 'edbsrvr'. This configuration item is not used for named server instances (see below Multiple Server Instances for more information on named server instances). |
| Server Description | Used in conjunction with the "Server Name" configuration entry to give more information about the ElevateDB Server to external clients once they have connected to the ElevateDB Server. The default value is 'ElevateDB Server'. |
| Server Address | Specifies the IP address that the ElevateDB Server should bind to when listening for incoming connections from remote sessions. The default value is blank (""), which specifies that the ElevateDB Server should bind to all available IP addresses. |
| Server Port | Specifies the port that the ElevateDB Server should bind to when listening for incoming connections from remote sessions. The default value is 12010. |
| Server Thread Cache Size | Specifies the number of threads that the ElevateDB Server should actively cache for connections. When a thread is terminated in the server it will be added to this thread cache until the number of threads cached reaches this value. This allows the ElevateDB Server to re-use the threads from the cache instead of having to constantly create/destroy the threads as needed, which can improve the performance of the ElevateDB Server if there are many connections and disconnections occurring. The default value is 10. |
| Server Encryption Password | Specifies the encryption password used by the ElevateDB Server for encrypting all communications with remote sessions. The default value is 'elevatesoft'. ElevateDB uses the Blowfish block cipher encryption algorithm with 128-bit MD5 hash keys for encryption. Please see the Encryption topic for more information. |
| Server Encrypted Only | Specifies whether all incoming connections from remote sessions should be encrypted or not. If this configuration entry is set to 1 (True), then all incoming connections to the ElevateDB Server that are not encrypted will be rejected with an error. The default value is 0 (False). |
| Server Session Timeout | Specifies how long the ElevateDB Server should wait for a request from a connected remote session before it disconnects the session. This is done to keep the number of concurrent connections at a minimum. Once a session has been disconnected by the ElevateDB Server, the session is then considered to be "dead" until either the remote session reconnects to the session in the server, or the server removes the session according to the parameters specified by the "Server Dead Session Interval", "Server Dead Session Expiration", and "Server Maximum Dead Sessions" configuration entries (below). A remote session may enable pinging in order to prevent the ElevateDB Server from disconnecting the remote session due to this configuration entry. The default value is 180 seconds, or 3 minutes. |
| Server Dead Session Interval | Specifies how often the ElevateDB Server will poll the disconnected sessions to see if any need to be removed according to the "Server Dead Session Expiration" or "Server Maximum Dead Sessions" configuration entries (below). The default value is 30 seconds. |
| Server Dead Session Expiration | Specifies how long a session can exist in the ElevateDB Server in a disconnected, or "dead", state before the server removes the session. This is done to prevent a situation where "dead" sessions accumulate from client applications whose network connections were permanently interrupted. The default value is 300 seconds, or 5 minutes. |
| Server Maximum Dead Sessions | Specifies how many "dead" sessions can accumulate in the ElevateDB Server before the server begins to remove them immediately, irrespective of the "Server Dead Session Expiration" configuration entry (above). If the "Server Maximum Dead Sessions" configuration entry is exceeded, then the server removes the "dead" sessions in oldest-to-youngest order until the number of "dead" sessions is at or under the setting for this configuration entry. The default value is 64. |
| Server Authorized Addresses | Specifies which IP addresses are authorized to access the ElevateDB Server. This is commonly referred to as a "white list". There is no limit to the number of addresses that can be specified, and the IP address entries may contain the asterisk (*) wildcard character to represent any portion of an address. |
| Server Blocked Addresses | Specifies which IP addresses are not allowed to access the ElevateDB Server. This is commonly referred to as a "black list". There is no limit to the number of addresses that can be specified, and the IP address entries may contain the asterisk (*) wildcard character to represent any portion of an address. |
| Server Run Jobs | Specifies whether the ElevateDB Server is allowed to schedule and run jobs that are defined in the Configuration Database. If this configuration entry is set to 1 (True, and the default), then the "Server Job Category" configuration entry (below) determines which category of jobs that the server will schedule and run. |
| Server Job Category | Specifies which job category the ElevateDB Server will schedule and run if the "Server Run Jobs" configuration entry is set to 1 (True). This configuration entry can contain any value, and the default value is blank (''), which indicates that the server can run all job categories. A job category is assigned to each job when it is created via the CREATE JOB DDL statement. |
| Server Job Retries | Specifies how many times the ElevateDB Server will attempt to execute a given job before disabling the job. The default value is 10. |
| Trace | Specifies whether tracing is enabled in the ElevateDB Server. If this configuration entry is set to 1 (True), then the ElevateDB Server will log every request/response to/from the server to the trace file name indicated by the "Trace File Name" configuration entry. The default value is 0 (False). |
| Trace File Name | Specifies the trace file name to use when tracing is enabled (see above). The "Max Trace File Size" and "Auto-Increment Trace File Name" configuration entries control how the trace file is managed (see below). The default value is "edbtrace.log". |
| Max Trace File Size | Specifies the maximum allowed size of the trace file. The default value is 128MB (134217728 bytes). |
| Auto-Increment Trace File Name | Specifies how to handle the trace file when the maximum allowed trace file size is reached or exceeded. If this configuration entry is set to 0 (False), then the trace file name will renamed with a ".bak" extension and a new trace file will be started with the value of the "Trace File Name". If this configuration entry is set to 1 (True), then the trace file name will be renamed to <Trace File Name> + <Auto-Incrementing Number> + Trace File Name Extension> (starting at 1 for the <Auto-Incrementing Number> portion of the trace file name), and a new trace file will be started with the value of the "Trace File Name". The default value is 0 (False). |
| Max Auto-Increment Trace File Name | Specifies the maximum number of auto-incrementing trace files that will be created before the auto-incrementing trace file name is reset to 1. This value, in conjunction with the Max Trace File Size setting, determines the maximum amount of disk space that will be used when using auto-incrementing trace files. The default value is 64. |
Multiple Server Instances
Multiple instances of the ElevateDB Server can be run on the same physical machine through named server instances. Named server instances are simply instances of the ElevateDB Server that were executed using two special command-line switches:
edbsrvr.exe /name=<Server Instance Name> /desc=<Server Instance Description>
Named server instances use the passed name and description to provide the name of the ElevateDB Server instance, as well as the description. The name parameter is also used to determine which section of the edbsrvr.ini (Windows) or edbsrvr.cnf (Linux) file is used for configuration purposes. Instead of just the normal "Server" section being used, the section is named using the provided server name. For example, if the named server instance is called "MyServer", then the section where the configuration is stored will be the following:
[Server_MyServer]
The description parameter, if also specified, is immediately written to the named server instance section. All other configuration options described above in the Configuration Reference must be modified by running the ElevateDB Server as a normal application on Windows and using the Edit Server Options in the ElevateDB Server's user interface. You can run the ElevateDB Server as a normal application on Windows in order to modify the configuration of a named server instance. For example, to modify the MyServer configuration you would use the following from the command-line:
edbsrvr.exe /name=MyServer"
In order to use a named server instance as a Windows service, the /name parameter must be specified during the installation of the service. For example, if the named server instance is called "MyServer", then the service installation would be accomplished using the following from the command-line:
edbsrvr.exe /install /name=MyServer /desc="My Server"
When you want to start the named server instance as a Windows service, you would simply just use the following from the command-line:
net start MyServer
The following example shows how you would install two ElevateDB Server named server instances as Windows services, and then start them:
edbsrvr.exe /install /name=MyFirstServer /desc="My First Server"

edbsrvr.exe /install /name=MySecondServer /desc="My Second Server"

net start MyFirstServer

net start MySecondServer
This web page was last updated on Tuesday, September 16, 2025 at 04:56 PM | Privacy Policy © 2026 Elevate Software, Inc. All Rights Reserved Questions or comments ? |
