 | Products |
| Home » Technical Support » ElevateDB Technical Support » Product Manuals » ElevateDB Version 2 Manual for Delphi 7 » Local Application Tutorial » Creating the Application |
The following steps will guide you through creating a basic local application using ElevateDB.
 It is assumed that you have already created the required database using the steps outlined in the Creating the Tutorial Database topic.
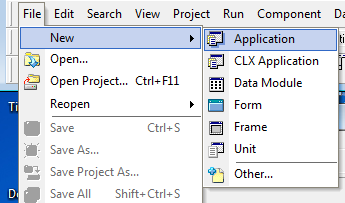
1. Click on the File option from the main menu.
2. Click on the New option from the File menu, and click on the Application option from the New sub-menu.
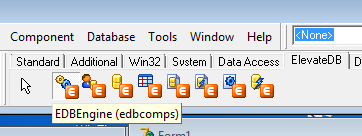
3. Select the ElevateDB tab on the component palette.
4. Click on the TEDBEngine component on the ElevateDB tab on the component palette and then click on the Form1 form that was created for you by Delphi. The TEDBEngine component will be dropped on the form.
5. Hit the F11 key to bring forward the Object Inspector. In the Object Inspector, click on the ConfigPath property and change its value to C:\Tutorial.

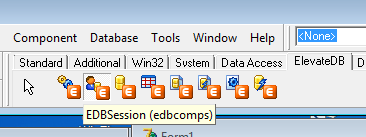
6. Click on the TEDBSession component on the ElevateDB tab on the component palette, and then click on the Form1 form. The TEDBSession component will be dropped on the form.
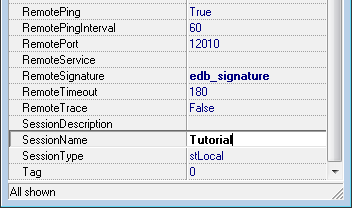
7. Hit the F11 key to bring forward the Object Inspector. In the Object Inspector, click on the SessionName property and change its value to Tutorial, click on the LoginUser property and change its value to the default administrator user name Administrator, and click on the LoginPassword property and change its value to the default Administrator user password EDBDefault.
8. Click on the TEDBDatabase component on the ElevateDB tab on the component palette, and then click on the Form1 form. The TEDBDatabase component will be dropped on the form.
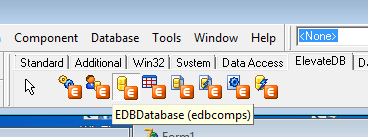
9. Hit the F11 key to bring forward the Object Inspector. In the Object Inspector, click on the SessionName property and change its value to Tutorial. Click on the DatabaseName property and change its value to TutorialDB. Click on the Database property and select the Tutorial database that you have already created from the drop-down list.

10. Click on the TEDBTable component on the ElevateDB tab on the component palette, and then click on the Form1 form. The TEDBTable component will be dropped on the form.
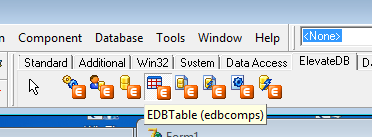
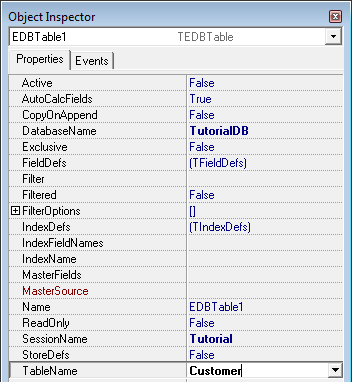
11. Hit the F11 key to bring forward the Object Inspector. In the Object Inspector, click on the SessionName property and change its value to Tutorial. Click on the DatabaseName property and change its value to TutorialDB. Click on the TableName property and change its value to Customer. Click on the Active property and change its value to True. If you have followed all of the steps correctly, the Active property should successfully change to True without error.
12. Select the Data Access tab on the component palette.
13. Click on the TDataSource component on the Data Access tab on the component palette, and then click on the Form1 form. The TDataSource component will be dropped on the form.
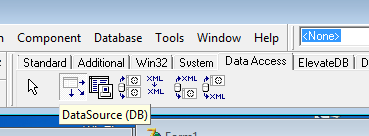
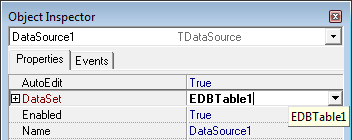
14. Hit the F11 key to bring forward the Object Inspector. In the Object Inspector, click on the DataSet property and change its value to EDBTable1.
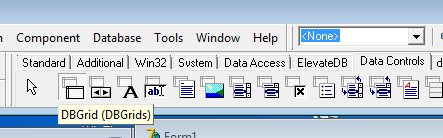
15. Select the Data Controls tab on the component palette.
16. Click on the TDBGrid component on the Data Controls tab on the component palette, and then click on the Form1 form. The TDBGrid component will be dropped on the form. You can use the design-time anchors to resize the TDBGrid component as required on the form.
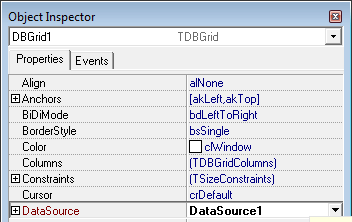
17. Hit the F11 key to bring forward the Object Inspector. In the Object Inspector, click on the DataSource property and change its value to DataSource1.
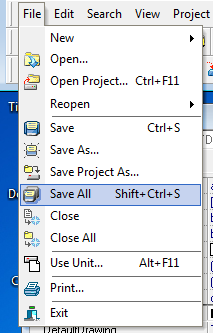
18. Click on the File option from the main menu.
19. Click on the Save All option from the File menu.
20. Save the project and the main form/unit under the desired names.
You have now successfully created a basic local application for ElevateDB.
1. Click on the File option from the main menu.
2. Click on the New option from the File menu, and click on the Application option from the New sub-menu.
3. Select the ElevateDB tab on the component palette.
4. Click on the TEDBEngine component on the ElevateDB tab on the component palette and then click on the Form1 form that was created for you by Delphi. The TEDBEngine component will be dropped on the form.
5. Hit the F11 key to bring forward the Object Inspector. In the Object Inspector, click on the ConfigPath property and change its value to C:\Tutorial.
6. Click on the TEDBSession component on the ElevateDB tab on the component palette, and then click on the Form1 form. The TEDBSession component will be dropped on the form.
7. Hit the F11 key to bring forward the Object Inspector. In the Object Inspector, click on the SessionName property and change its value to Tutorial, click on the LoginUser property and change its value to the default administrator user name Administrator, and click on the LoginPassword property and change its value to the default Administrator user password EDBDefault.
8. Click on the TEDBDatabase component on the ElevateDB tab on the component palette, and then click on the Form1 form. The TEDBDatabase component will be dropped on the form.
9. Hit the F11 key to bring forward the Object Inspector. In the Object Inspector, click on the SessionName property and change its value to Tutorial. Click on the DatabaseName property and change its value to TutorialDB. Click on the Database property and select the Tutorial database that you have already created from the drop-down list.
10. Click on the TEDBTable component on the ElevateDB tab on the component palette, and then click on the Form1 form. The TEDBTable component will be dropped on the form.
11. Hit the F11 key to bring forward the Object Inspector. In the Object Inspector, click on the SessionName property and change its value to Tutorial. Click on the DatabaseName property and change its value to TutorialDB. Click on the TableName property and change its value to Customer. Click on the Active property and change its value to True. If you have followed all of the steps correctly, the Active property should successfully change to True without error.
12. Select the Data Access tab on the component palette.
13. Click on the TDataSource component on the Data Access tab on the component palette, and then click on the Form1 form. The TDataSource component will be dropped on the form.
14. Hit the F11 key to bring forward the Object Inspector. In the Object Inspector, click on the DataSet property and change its value to EDBTable1.
15. Select the Data Controls tab on the component palette.
16. Click on the TDBGrid component on the Data Controls tab on the component palette, and then click on the Form1 form. The TDBGrid component will be dropped on the form. You can use the design-time anchors to resize the TDBGrid component as required on the form.
17. Hit the F11 key to bring forward the Object Inspector. In the Object Inspector, click on the DataSource property and change its value to DataSource1.
18. Click on the File option from the main menu.
19. Click on the Save All option from the File menu.
20. Save the project and the main form/unit under the desired names.
You have now successfully created a basic local application for ElevateDB.
This web page was last updated on Wednesday, May 28, 2025 at 08:24 AM | Privacy Policy © 2025 Elevate Software, Inc. All Rights Reserved Questions or comments ? |
