 | Products |
| Home » Technical Support » ElevateDB Technical Support » Product Manuals » ElevateDB Version 2 Data Access Components Manual » Using the ODBC Driver » Data Source Configuration Tutorial |
A data source, or DSN (Data Source Name), is used by applications that use ODBC to locate and access a specific database in a specific location. Once you have configured a data source in the ODBC Administrator, you may use this data source name in any application that can access ODBC. Please see the Application Compatibility topic in this manual for more information on applications that have been specifically tested with the ElevateDB ODBC Driver.
Step-By-Step Instructions
Complete the following steps to properly configure a data source that uses the ElevateDB ODBC Driver. These steps are illustrated using Windows 7, but are very similar for most other versions of Windows.
1. Run the ODBC Administrator, which is located in the Administrative Tools folder in the Control Panel. To reach the Administrative Tools folder, complete the following steps:
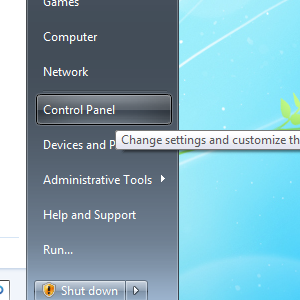
a. Click on the Control Panel link from the Start Menu.
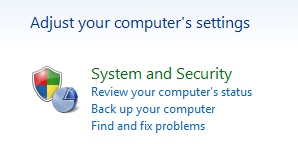
b. Click on the System and Security link from the Start Menu.
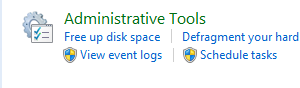
d. Click on the Administrative Tools link in the System and Security window of the Control Panel.
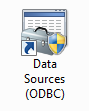
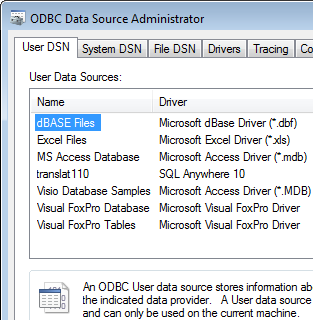
e. Double-click on the Data Sources (ODBC) icon in the Administrative Tools folder. This will bring forward the ODBC Administrator dialog.
 By default, 32-bit versions of Windows use the 32-bit ODBC Administrator, and 64-bit versions of Windows use the 64-bit ODBC Administrator, when launching the ODBC Administrator via the Administrative Tools link. If you're using a 64-bit version of Windows, then you must use the 32-bit ODBC Administrator located here in order to configure 32-bit data sources for use with 32-bit applications and the 32-bit ElevateDB ODBC Driver:
where <WindowsInstallDir> is the base Windows installation directory, usually c:\Windows.
2. If you want the data source to be accessible by all users, then click on the System DSN tab. If you want the data source to only be accessible to the current user, then click User DSN tab (the default page). For the rest of this tutorial, we will be configuring a new User DSN.
Only Administrators can define System DSNs since they require access to the HKEY_LOCAL_MACHINE registry hive of the registry.
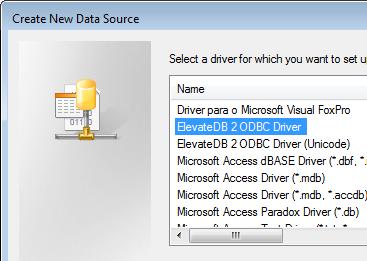
3. Click on the Add button to begin adding a data source. This will bring forward a dialog with a list of the installed ODBC drivers. Select the ElevateDB ODBC Driver from the list of drivers.
5. Click on the Finish button to complete the driver selection process and begin the configuration process.
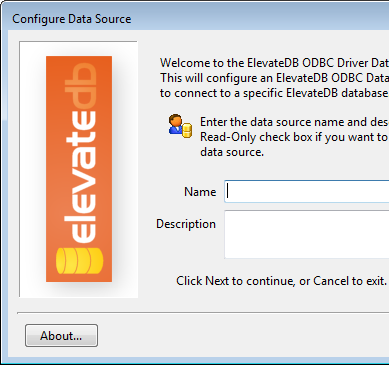
6. An ElevateDB ODBC Driver configuration wizard dialog will now be shown. Follow the instructions on this wizard to complete the data source configuration.
7. Once the configuration steps have been completed and you have clicked on the Finish button in the dialog, you will be brought back to the DSN page of the ODBC Administrator where you should now see the DSN that you have just created.
If at any time you wish to re-configure the data source, simply choose the appropriate tab page (User DSN or System DSN), select the data source name that you previously added from the list of data sources, and then click on the Configure button. This will bring forward the same configuration wizard dialog as before, except in this case you cannot specify a name for the data source.
Step-By-Step Instructions
Complete the following steps to properly configure a data source that uses the ElevateDB ODBC Driver. These steps are illustrated using Windows 7, but are very similar for most other versions of Windows.
1. Run the ODBC Administrator, which is located in the Administrative Tools folder in the Control Panel. To reach the Administrative Tools folder, complete the following steps:
a. Click on the Control Panel link from the Start Menu.
b. Click on the System and Security link from the Start Menu.
d. Click on the Administrative Tools link in the System and Security window of the Control Panel.
e. Double-click on the Data Sources (ODBC) icon in the Administrative Tools folder. This will bring forward the ODBC Administrator dialog.
<WindowsInstallDir>\SysWoW64\odbcad32.exe
where <WindowsInstallDir> is the base Windows installation directory, usually c:\Windows.
2. If you want the data source to be accessible by all users, then click on the System DSN tab. If you want the data source to only be accessible to the current user, then click User DSN tab (the default page). For the rest of this tutorial, we will be configuring a new User DSN.
3. Click on the Add button to begin adding a data source. This will bring forward a dialog with a list of the installed ODBC drivers. Select the ElevateDB ODBC Driver from the list of drivers.
5. Click on the Finish button to complete the driver selection process and begin the configuration process.
6. An ElevateDB ODBC Driver configuration wizard dialog will now be shown. Follow the instructions on this wizard to complete the data source configuration.
7. Once the configuration steps have been completed and you have clicked on the Finish button in the dialog, you will be brought back to the DSN page of the ODBC Administrator where you should now see the DSN that you have just created.
If at any time you wish to re-configure the data source, simply choose the appropriate tab page (User DSN or System DSN), select the data source name that you previously added from the list of data sources, and then click on the Configure button. This will bring forward the same configuration wizard dialog as before, except in this case you cannot specify a name for the data source.
This web page was last updated on Tuesday, September 16, 2025 at 04:56 PM | Privacy Policy © 2026 Elevate Software, Inc. All Rights Reserved Questions or comments ? |
