 | Products |
| Home » Technical Support » Elevate Web Builder Technical Support » Product Manuals » Elevate Web Builder 3 Manual » Using the IDE » Using the Project Manager |
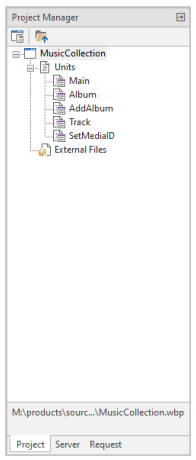
The project manager provides a quick and easy-to-use interface to the contents of a project, including all source units and external files such as images, fonts, and/or JavaScript source files.
 Simply adding an external JavaScript source file to a project is insufficient for actually referencing such external code from within an application. You must also define an external interface to the classes, functions, procedures, and variables that you wish to reference in your application code. For more information on defining external interfaces, please see the External Interfaces topic.
Adding an Existing Source Unit to a Project
Use the following steps to add an existing source unit to a project using the project manager:
Use the following steps to remove a source unit from a project using the project manager:
Removing a source unit from a project does not delete the actual source unit file on disk. It only removes the reference to the source unit from the contains section of the project source file (.wbp) so that it will not be considered part of the project anymore.
Adding an Existing External File to a Project
Use the following steps to add an existing external file to a project using the project manager:
When adding an external local file, the file name selected will contain an absolute path to the file. Click on the relative path (R) button to convert the file path to a path that is relative to the root project path.
External Font Files
If you select Font as the type of external file to add, the Add External File dialog will change to look like the following:
This additional information is necessary to ensure that the proper font linking information is added to the application's HTML loader file during compilation, and to ensure that the proper font is selected at runtime. Use the Font Name combo box to select or enter the name of the font that should be used at runtime, and the Bold and Italic check boxes to specify if the font is a bold or italic version of the font.
Removing an External File from a Project
Use the following steps to remove an external file from a project using the project manager:
Removing an external file from a project does not delete the actual external file on disk. It only removes the reference to the external file from the project configuration file (.wbc) so that it will no longer be deployed as part of the project.
Opening Folders for the Project Contents
You can open the folder for the project, any source units, or any external files so that you can browse the contents of the folder using the Windows Explorer.
Use the following steps to open a folder using the project manager:
Adding an Existing Source Unit to a Project
Use the following steps to add an existing source unit to a project using the project manager:
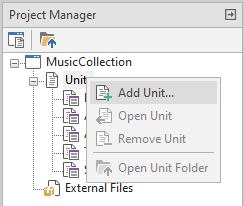
- Right-click on the Units node of the project contents tree. The context menu for the project manager will appear. Click on the Add Unit menu option.
- A Windows file open dialog will appear. Navigate to, and select, the existing source unit that you wish to add to the project. Click on the Open button in the Windows file open dialog to complete adding the source unit to the project.
Use the following steps to remove a source unit from a project using the project manager:
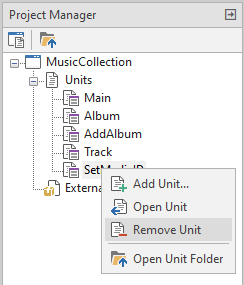
- Right-click on the name of the source unit that you wish to remove. The context menu for the project manager will appear. Click on the Remove Unit menu option.
- A confirmation dialog will be displayed, asking you to confirm the removal of the source unit from the project. Click on the Yes button to continue, or the No button to cancel the removal.
Adding an Existing External File to a Project
Use the following steps to add an existing external file to a project using the project manager:
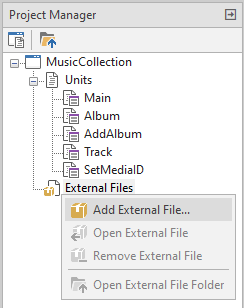
- Right-click on the External Files node of the project contents tree. The context menu for the project manager will appear. Click on the Add External File menu option.
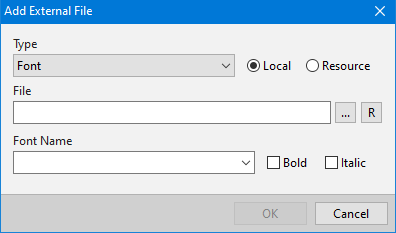
- The Add External File dialog will appear:

Select the type of external file to add using the Type combo box. If the file is a local file (the default), then leave the Local radio button selected and specify the local file name using the File edit control and/or the file selection button to the right of the edit control. If the file is an HTTP resource, then select the Resource radio button and specify the URL for the resource using the File edit control. Click the OK button when you are done specifying the external file to add.
External Font Files
If you select Font as the type of external file to add, the Add External File dialog will change to look like the following:
This additional information is necessary to ensure that the proper font linking information is added to the application's HTML loader file during compilation, and to ensure that the proper font is selected at runtime. Use the Font Name combo box to select or enter the name of the font that should be used at runtime, and the Bold and Italic check boxes to specify if the font is a bold or italic version of the font.
Removing an External File from a Project
Use the following steps to remove an external file from a project using the project manager:
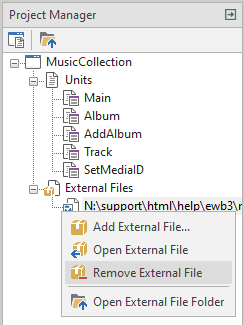
- Right-click on the name of the external file that you wish to remove. The context menu for the project manager will appear. Click on the Remove External File menu option.
- A confirmation dialog will be displayed, asking you to confirm the removal of the external file from the project. Click on the Yes button to continue, or the No button to cancel the removal.
Opening Folders for the Project Contents
You can open the folder for the project, any source units, or any external files so that you can browse the contents of the folder using the Windows Explorer.
Use the following steps to open a folder using the project manager:
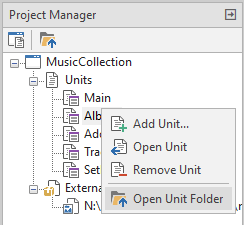
- Right-click on the name of the project, a source unit, or an external file whose folder you wish to open. The context menu for the project manager will appear. Click on the Open Project Folder menu option for the project, the Open Unit Folder menu option for a source unit, or the Open External File Folder menu option for an external file.
This web page was last updated on Tuesday, September 16, 2025 at 04:56 PM | Privacy Policy © 2026 Elevate Software, Inc. All Rights Reserved Questions or comments ? |
