 | Products |
| Home » Technical Support » Elevate Web Builder Technical Support » Product Manuals » Elevate Web Builder 3 Manual » Using the IDE » Modifying IDE Settings |
The Settings dialog allows you to configure the following aspects of the IDE:
where <UserName> is the name of the user account under which the IDE is being run.
Use the following steps to modify the settings for the IDE:

After making any changes, click on the OK button to save the changes, or the Cancel button to discard the changes.
Project
The Project settings page provides options for modifying the project settings.
Editor
The Editor page provides options for modifying the code editor settings.
Editor Display
The Editor Display page provides options for modifying the code editor settings.
Designer
The Designer page provides options for modifying the designer settings.
Component Library
The Component Library page provides options for modifying the component library settings.
Help
The Help page provides options for adding and removing help files (*.wbh). By default, the help for the IDE is added automatically during the IDE startup process, so normally you will not need to add any additional help files. However, if you add any 3rd party components to the component library, they may come with online help to use with the components, and that help can be added here.
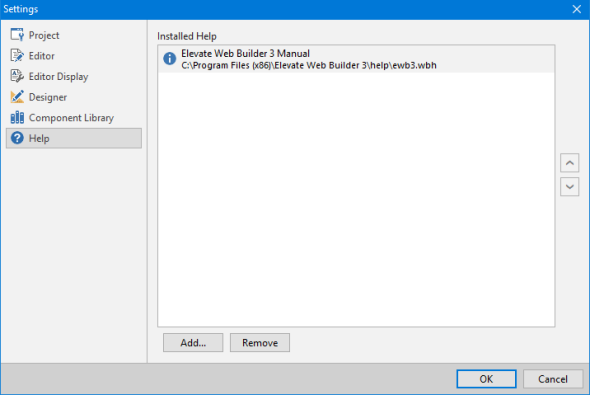
 The default Elevate Web Builder help file is always shown in the list of added help files, but it cannot be removed.
Adding Help
In order to add a help, complete the following steps:
In order to remove a help file, complete the following steps:
- The project settings
- The code editor settings
- The code editor display settings
- The designer settings
- The component library settings
- The installed help files
C:\Users\<UserName>\AppData\Local\Elevate Software\Elevate Web Builder 3\ewbide.ini
where <UserName> is the name of the user account under which the IDE is being run.
Use the following steps to modify the settings for the IDE:
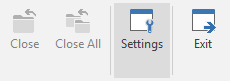
- Click on the File tab on the main menu.
- Click on the Settings button on the File menu to open the Settings dialog.
After making any changes, click on the OK button to save the changes, or the Cancel button to discard the changes.
Project
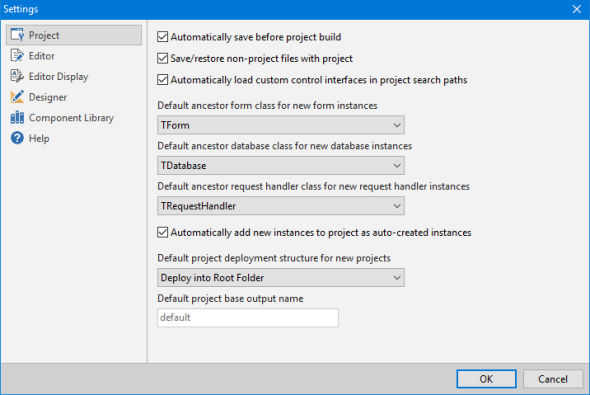
The Project settings page provides options for modifying the project settings.
| Option | Description |
| Automatically save before project build | Select this check box to make sure that the IDE automatically saves all modified units and project files before building the currently-loaded project. This option is selected by default. |
| Save/restore non-project files with project | Select this check box to have the IDE automatically save and restore any units that are open in the IDE, but are not actually part of the currently-loaded project. This option also applies to control interfaces that are open in the IDE and is selected by default. |
| Automatically load custom control interfaces in project search paths | Select this check box to have the IDE automatically load any custom control interface files located in the project's compiler search paths whenever a project is opened in the IDE. When checking to see if a control interface has been customized, the IDE compares the path of the default control interface file used with the component library (based upon the Library Search Paths setting on the Component Library page) with the path of any control interfaces with the same file name present in the project's compiler search paths. If a match is found, then the control interface file found in the project's compiler search paths is loaded into the IDE and used with the project's form designers. After the project is closed, the default control interfaces are reloaded. This check box is selected by default. |
| Default ancestor form class for new form instances | Specifies the default ancestor form class for the new form class selection dialog that is displayed when creating a new form in the IDE. The default ancestor form class is the TForm class. |
| Default ancestor database class for new database instances | Specifies the default ancestor database class for the new database class selection dialog that is displayed when creating a new database in the IDE. The default ancestor database class is the TDatabase class. |
| Default ancestor request handler class for new request handler instances | Specifies the default ancestor request handler class for the new request handler class selection dialog that is displayed when creating a new request handler in the IDE. The default ancestor request handler class is the TRequestHandler class. |
| Automatically add new instances to auto-created instances | Select this check box to make sure that any newly-created forms, databases, or request handlers are automatically added to the list of auto-created designer instances for the application. This option is selected by default. |
| Default project deployment structure for new projects | Use this combo box to select the default project deployment structure. This setting is only applicable to client applications, and the two options are to deploy the application files into the root folder (the default) or to deploy the application files into a project-specific folder. If you select the project-specific folder deployment structure, any new client projects will automatically have their project deployment path set to the same name as the project. |
| Default project base output name | If you select the project-specific folder deployment structure, you can then enter the default project base output name here. The default project base output name is used to construct the default output file names for both the HTML loader file and the JavaScript file when building and emitting client applications. The default value is "index". |
Editor
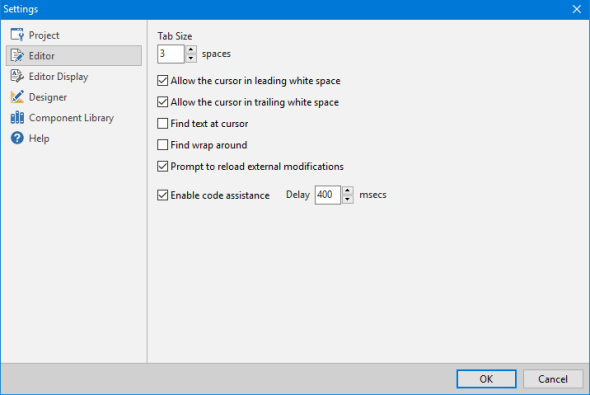
The Editor page provides options for modifying the code editor settings.
| Option | Description |
| Tab Size | The number of spaces between each tab position. The default is 3 spaces. |
| Allow the cursor in leading white space | Select this check box in order to allow the cursor to be positioned in any leading white space in the code editor. By default, if you move to an area of the code editor that is leading white space, the cursor will be moved to the next closest source code to the white space. The definition of "white space" in this context is the area of the code editor where there is no source code present. |
| Allow the cursor in trailing white space | Select this check box in order to allow the cursor to be positioned in any trailing white space in the code editor. By default, if you move to an area of the code editor that is trailing white space, the cursor will be moved to the previous closest source code to the white space. The definition of "white space" in this context is the area of the code editor where there is no source code present. |
| Find text at cursor | Select this check box to have the code editor populate the Find or Replace search text box with the current word under the cursor when searching or replacing text in the code editor. By default, the last searched text will appear in the Find or Replace search text box. |
| Find wrap around | Select this check box to have the code editor wrap around to the start/end of the source when searching or replacing text in the code editor. The direction in which the searching or replacing wraps is determined by the direction of the search or replace operation. By default, the code editor will stop when reaching the start/end of the source during a search or replace operation. |
| Prompt to reload external modifications | Select this check box to have the code editor prompt the user when any source loaded in the code editor is modified by an external application. The prompt will ask the user to confirm whether they wish to load the modified source into the code editor. By default, the code editor will prompt the user when any source is changed by an external application. |
| Enable code assistance | Select this check box to enable code assistance in the code editor. Code assistance provides context-sensitive keyword and identifier hints after a short delay when you stop typing a keyword or identifier. The short delay is specified via the Delay edit box. Code assistance is enabled, by default, and the default delay is 400 millseconds. |
Editor Display
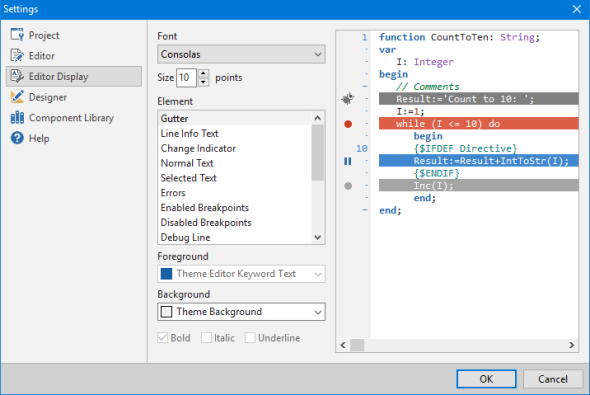
The Editor Display page provides options for modifying the code editor settings.
| Option | Description |
| Font | Use this combo box to select the fixed-width font to use for all text in the code editor. The default code editor font is the "Consolas" font. |
| Size | The size of the fixed-width font, in points. The default size is 10 points. |
| Element | Use this list box to select the various text elements present in the code editor and modify their visual properties such as their foreground and background colors and the style of the text. |
Designer
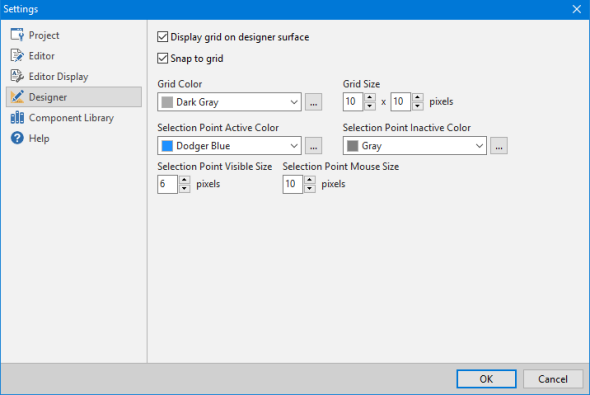
The Designer page provides options for modifying the designer settings.
| Option | Description |
| Display grid on designer surface | Select this check box to enable the display of an alignment grid on the designer surface. The default settings is to enable the display of an alignment grid. |
| Snap controls to grid | Select this check box to cause the designer to automatically align any controls/elements to the grid when they are inserted, resized, or moved. The default setting is to enable the snapping of controls to the alignment grid. |
| Grid Color | Select the color of the alignment grid. The default is "Dodger Blue". |
| Grid Size | The number of pixels between each grid point in the alignment grid, both on the horizontal (X) and vertical (Y) axes. The default grid size is 10 pixels by 10 pixels. |
| Selection Point Active Color | Select the color of selection points when the designer is active. The default is "Dodger Blue". |
| Selection Point Inactive Color | Select the color of selection points when the designer is not active. The default is "Gray". |
| Selection Point Visible Size | Use this edit to specify the visible size of selection points. The default size is 6 pixels (square). |
| Selection Point Mouse Size | Use this edit to specify the size of the area in which the mouse can operate on the selection points. If you are visually-impaired, then you may want to increase these values to make working with the selection points easier. The default is 10 pixels (square). |
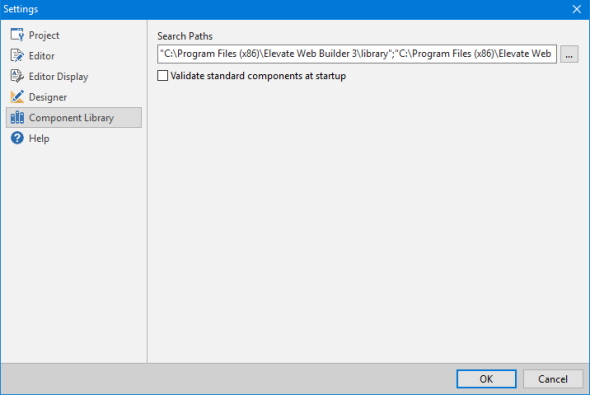
Component Library
The Component Library page provides options for modifying the component library settings.
| Option | Description |
| Search Paths | The component library search paths are used to specify where the component library source unit files are located. These search paths ensure that the compiler can always find the component units (and any referenced control interfaces) installed into the component library, as well as any core units that are necessary for all client and server applications. The component library search paths are initially configured during installation. If you wish to add additional paths to the component library search paths, then this is where you would do so. When specifying more than one search path, be sure to separate multiple paths with a semicolon (;), and enclose any search paths that contain spaces with double-quotes (""). |
| Validate standard components at startup | Select this check box to have the IDE check for the existence of the standard components during startup. If any of the standard components are missing, or not found in their default location, then the user will be asked to confirm adding the missing standard components. By default, the IDE will always validate the standard components during startup. |
Help
The Help page provides options for adding and removing help files (*.wbh). By default, the help for the IDE is added automatically during the IDE startup process, so normally you will not need to add any additional help files. However, if you add any 3rd party components to the component library, they may come with online help to use with the components, and that help can be added here.
Adding Help
In order to add a help, complete the following steps:
- Click on the Add button.
- The Add Help dialog will appear.
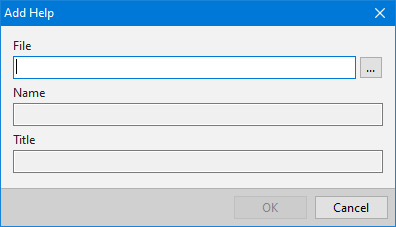
- In this dialog, specify the file name of the help file (.wbh) that you wish to add to the IDE in the edit control. You can type in the file name directly, or use the browse button (...) to select the help file using a common Windows file dialog. If you use the browse button, the help file name and title will be populated from the help file after the file is selected.
- Click on the OK button. If the specified file is a valid help file, then the help file will be added to the IDE for use from the Help menu. If the specified file is not a valid help file, then an error message will be displayed indicating any issues with the help file.
In order to remove a help file, complete the following steps:
- Select an existing help file from the list of help files.
- Click on the Remove button.
This web page was last updated on Tuesday, September 16, 2025 at 04:56 PM | Privacy Policy © 2026 Elevate Software, Inc. All Rights Reserved Questions or comments ? |
