 | Products |
| Home » Technical Support » Elevate Web Builder Technical Support » Product Manuals » Elevate Web Builder 3 Manual » Using the IDE » Using the Server Manager |
The server manager is used to define web servers that can be accessed by the IDE for the both client and server application deployment, remote server application debugging, and server administration. Please see the Deploying a Project topic for more information on how to select a web server when deploying a client or server application, the Running and Debugging a Project topic for more information on how to select a web server when debugging a server application, and the Web Server Administration topic for more information on using the server manager to administer a web server.
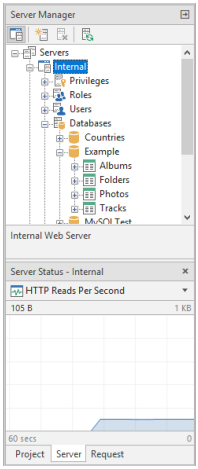
For ease of use, the IDE includes an embedded version of the Elevate Web Builder Web Server for development. By default, this web server is called Internal and is automatically set up during the IDE startup with a specific configuration for use with the localhost loopback host and the standard HTTP/HTTPS ports 80 and 443. You can use the instructions below on how to edit a web server in order to change any of the settings for the Internal web server. However, the Internal web server cannot be renamed or deleted in the server manager.
You can manually start and stop the Internal web server by clicking on the embedded web server button in the server manager toolbar:

If the embedded web server button is selected, the Internal web server has been started.
 It is important to note that these web servers are being defined from the perspective of the IDE, and these settings have no bearing on how the web server instance being accessed by the IDE is configured. Therefore, these settings must be correct for the target web server instance or various aspects of the IDE, such as application deployment and server administration, will not work properly. The only exception to this is the Internal web server. For the Internal web server, the ports and resource names do actually control how the Internal web server is configured. Any changes to these settings for the Internal web server will result in the web server being automatically restarted in the IDE so that the new settings take effect.
Creating a New Server
Use the following steps to create a new server using the server manager:

After making any changes, click on the OK button to save the changes, or the Cancel button to discard the changes.
General
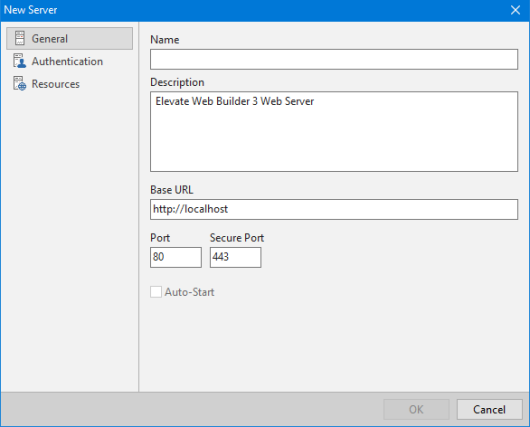
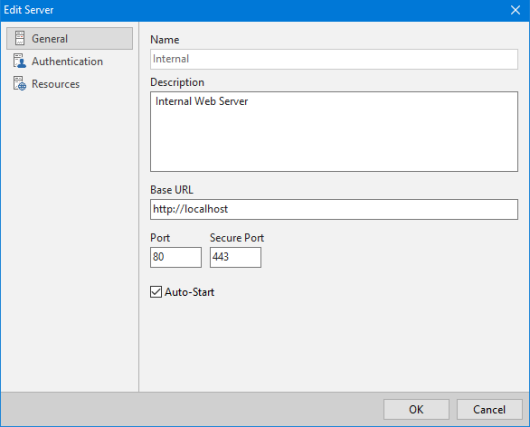
The General page provides options for specifying the name and description of the web server, along with the Base URL to use with any HTTP requests to the web server and the insecure HTTP and secure HTTPS ports to connect to when accessing the web server.
Authentication
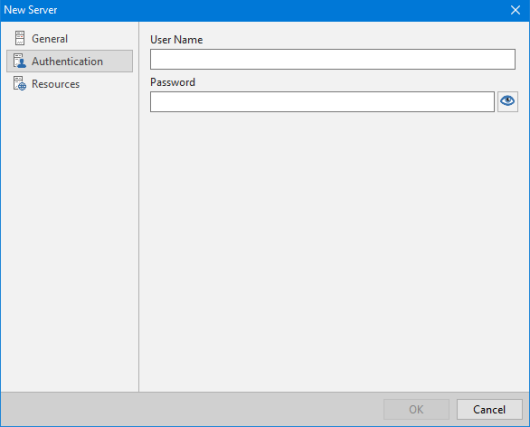
The Authentication page allows you to enter the user name and password to use during authentication. The IDE will first authenticate the user on the web server before making any HTTP requests, and will also authenticate the user on-demand if the web server indicates that the server session has expired.
Resources
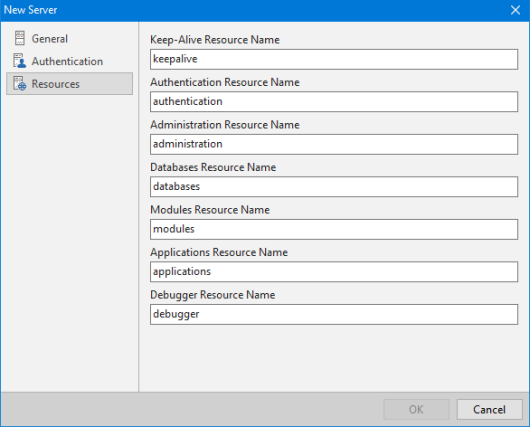
The Resources page provides options for specifying the defined resources on the web server. These resource names are used in conjunction with the base URL defined on the General page to construct HTTP requests for the various APIs surfaced by the web server.
Editing an Existing Server
Use the following steps to edit an existing server using the server manager:
After making any changes, click on the OK button to save the changes, or the Cancel button to discard the changes.
Deleting an Existing Server
Use the following steps to delete an existing server using the server manager:
You can easily migrate defined server objects and/or content from one existing server to another existing server. Use the following steps to execute a server migration using the server manager:
After making any changes, click on the Migrate button to begin the migration, or the Cancel button to cancel the migration.
Viewing the Status of a Server
Use the following steps to view the status of a server using the server manager:
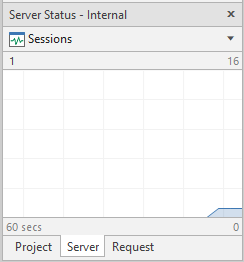
You can use the combo box to select which statistic you would like to view. The server statistics are updated in real time every 3 seconds.
Certain statistics for the embedded Internal web server are not valid because the web server is embedded in the IDE. For example, the Memory Usage statistic represents the total amount of memory used by the entire IDE, not just the Internal web server.
For ease of use, the IDE includes an embedded version of the Elevate Web Builder Web Server for development. By default, this web server is called Internal and is automatically set up during the IDE startup with a specific configuration for use with the localhost loopback host and the standard HTTP/HTTPS ports 80 and 443. You can use the instructions below on how to edit a web server in order to change any of the settings for the Internal web server. However, the Internal web server cannot be renamed or deleted in the server manager.
You can manually start and stop the Internal web server by clicking on the embedded web server button in the server manager toolbar:
If the embedded web server button is selected, the Internal web server has been started.
Creating a New Server
Use the following steps to create a new server using the server manager:
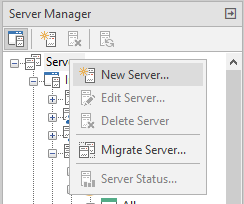
- Right-click on the Servers node of the server manager. The context menu for the server manager will appear. Click on the New Server menu option.
After making any changes, click on the OK button to save the changes, or the Cancel button to discard the changes.
General
The General page provides options for specifying the name and description of the web server, along with the Base URL to use with any HTTP requests to the web server and the insecure HTTP and secure HTTPS ports to connect to when accessing the web server.
| Setting | Description |
| Name | The name of the web server. |
| Description | The description of the web server. |
| Base URL | The base URL to use with any HTTP requests to the web server. The default base URL is "http://localhost". |
| Port | The port to use for insecure HTTP requests. The default port is 80. |
| Secure Port | The port to use for secure HTTP requests. The default secure port is 443. |
| Auto-Start | This check box is only enabled for the Internal web server and determines if the embedded web server is automatically started during the IDE startup. By default, the Internal web server is set to auto-start. |
Authentication
The Authentication page allows you to enter the user name and password to use during authentication. The IDE will first authenticate the user on the web server before making any HTTP requests, and will also authenticate the user on-demand if the web server indicates that the server session has expired.
| Setting | Description |
| User Name | The user name to use for authentication on the web server. |
| Password | The password for the user name. Click on the button with the eye icon in order to show the entered password. |
Resources
The Resources page provides options for specifying the defined resources on the web server. These resource names are used in conjunction with the base URL defined on the General page to construct HTTP requests for the various APIs surfaced by the web server.
| Setting | Description |
| Keep-Alive Resource Name | The resource name to use for keep-alive requests. The default value is "keepalive". |
| Authentication Resource Name | The resource name to use for authentication requests. The default value is "authentication". |
| Administration Resource Name | The resource name to use for administration requests. The default value is "administration". |
| Databases Resource Name | The resource name to use for database requests. The default value is "database". |
| Applications Resource Name | The resource name to use for server application requests. The default value is "applications". |
| Modules Resource Name | The resource name to use for native server module requests. The default value is "modules". |
| Debugger Resource Name | The resource name to use for debugger requests. The default value is "debugger". |
Editing an Existing Server
Use the following steps to edit an existing server using the server manager:
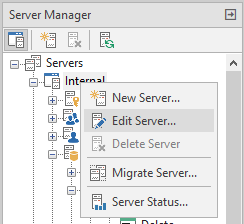
- Right-click on the server node that you want to edit. The context menu for the server manager will appear. Click on the Edit Server menu option.
After making any changes, click on the OK button to save the changes, or the Cancel button to discard the changes.
Deleting an Existing Server
Use the following steps to delete an existing server using the server manager:
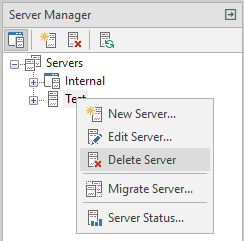
- Right-click on the server node that you want to delete. The context menu for the server manager will appear. Click on the Delete Server menu option.
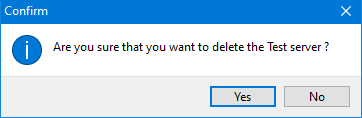
- A confirmation dialog will be displayed, asking you to confirm the removal of the server. Click on the Yes button to continue, or the No button to cancel the removal.
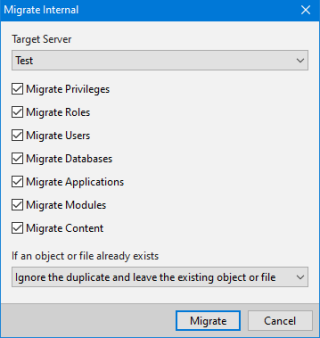
You can easily migrate defined server objects and/or content from one existing server to another existing server. Use the following steps to execute a server migration using the server manager:
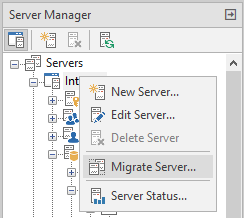
- Right-click on the server node that you want to migrate. The context menu for the server manager will appear. Click on the Migrate Server menu option.
After making any changes, click on the Migrate button to begin the migration, or the Cancel button to cancel the migration.
| Option | Description |
| Target Server | Use this combo box to select the target web server for the migration. |
| Migrate Privileges | Use this check box to specify whether privileges should be migrated. |
| Migrate Roles | Use this check box to specify whether roles should be migrated. |
| Migrate Users | Use this check box to specify whether users should be migrated. |
| Migrate Databases | Use this check box to specify whether databases should be migrated. |
| Migrate Applications | Use this check box to specify whether installed server applications should be migrated. |
| Migrate Modules | Use this check box to specify whether installed native server modules should be migrated. |
| Migrate Content | Use this check box to specify whether all static content should be migrated. |
| Migration Conflicts | Use this combo box to select what to do if a server object or file that is being migrated already exists on the target web server. |
Viewing the Status of a Server
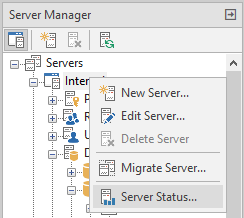
Use the following steps to view the status of a server using the server manager:
- Right-click on the server node that you want to examine. The context menu for the server manager will appear. Click on the Server Status menu option.
You can use the combo box to select which statistic you would like to view. The server statistics are updated in real time every 3 seconds.
This web page was last updated on Tuesday, September 16, 2025 at 04:56 PM | Privacy Policy © 2026 Elevate Software, Inc. All Rights Reserved Questions or comments ? |
